这里说的eosio智能合约不是泛指eos的智能合约,它是一个特殊的具体的合约。它本事可大了,我们一起来看看它有哪些功能
负责智能合约部署
$ cleos set contract hello.code ../eos-contract/hello -p hello.code
Publishing contract...
executed transaction: daabe65267af4b9a11e5ff90a165bbaac68469630f499bcea1ef0eb7da6d970c  1792 bytes  2558 us
#         eosio <= eosio::setcode               {"account":"hello.code","vmtype":0,"vmversion":0,"code":"0061736d01000000013b0c60027f7e006000017e600...
#         eosio <= eosio::setabi                {"account":"hello.code","abi":"00010c6163636f756e745f6e616d65046e616d6501026869000104757365720c61636...
注意下 eosio <= eosio::setcode和eosio <= eosio::setabi
这段log很明显的说明了
$ cleos set contract eosio build/contracts/eosio.bios -p eosio等价于调用eosio智能合约的setcode和setabi函数
$ cleos push action eosio setcode '[eosio.bios.wasm]' -p eosio
$ cleos push action eosio setabi eosio '[eosio.bios.abi] -p eosio
也就说合约部署是通过调用eosio合约来实现的
对应的源码:
set contract会产生setcode和setabi两个action
add_standard_transaction_options(contractSubcommand, "account@active");
   add_standard_transaction_options(codeSubcommand, "account@active");
   add_standard_transaction_options(abiSubcommand, "account@active");
   contractSubcommand->set_callback([&] {
      shouldSend = false;
      set_code_callback();
      set_abi_callback();
      std::cout << localized("Publishing contract...") << std::endl;
      send_actions(std::move(actions), 10000, packed_transaction::zlib);
   });

chain::action create_setcode(const name& account, const bytes& code) {
   return action {
      tx_permission.empty() ? vector<chain::permission_level>{{account,config::active_name}} : get_account_permissions(tx_permission),
      setcode{
         .account   = account,
         .vmtype    = 0,
         .vmversion = 0,
         .code      = code
      }
   };
}

struct setcode {
   account_name                     account;
   uint8_t                          vmtype = 0;
   uint8_t                          vmversion = 0;
   bytes                            code;

   static account_name get_account() {
      return config::system_account_name;
   }

   static action_name get_name() {
      return N(setcode);
   }
};

const static uint64_t system_account_name    = N(eosio);
set_code和set_abi都是通过调用system_account_name即eosio智能合约来执行的
负责账号创建
同样我们看看create account,其实就是调用eosio合约的newaccount函数
$ cleos create account eosio hello.code EOS7KBTMkUq4VPakqsZUnZfBbMbS2U7cn9qSa3q6G5ZzEeUeNSVgv EOS7KBTMkUq4VPakqsZUnZfBbMbS2U7cn9qSa3q6G5ZzEeUeNSVgv
executed transaction: 01aff4356a6277eec777494fc6aeaf97164c53997c46fe853247ed7e100f4987  200 bytes  911 us
#         eosio <= eosio::newaccount            {"creator":"eosio","name":"hello.code","owner":{"threshold":1,"keys":[{"key":"EOS7KBTMkUq4VPakqsZUnZ...
负责权限管理
这次是调用eosio的updateauth函数
$ cleos set account permission testaccount active '{"threshold" : 1, "keys" : [], "accounts" : [{"permission":{"actor":"bob","permission":"active"},"weight":1}, {"permission":{"actor":"stacy","permission":"active"},"weight":1}]}’ owner
executed transaction: b1bc9680a9ba615a6de8c3f7c692d7d28ff97edae245bb40f948692b14ea6c15  160 bytes  189 us
#         eosio <= eosio::updateauth            {"account":"testaccount","permission":"active","parent":"owner","auth":{"threshold":1,"keys":[],"acc...
warning: transaction executed locally, but may not be confirmed by the network yet
蛋生鸡,鸡生蛋问题
既然eosio是一个智能合约,而它又负责合约部署,那它自己是谁部署的呢?我们先来看下这个结构图
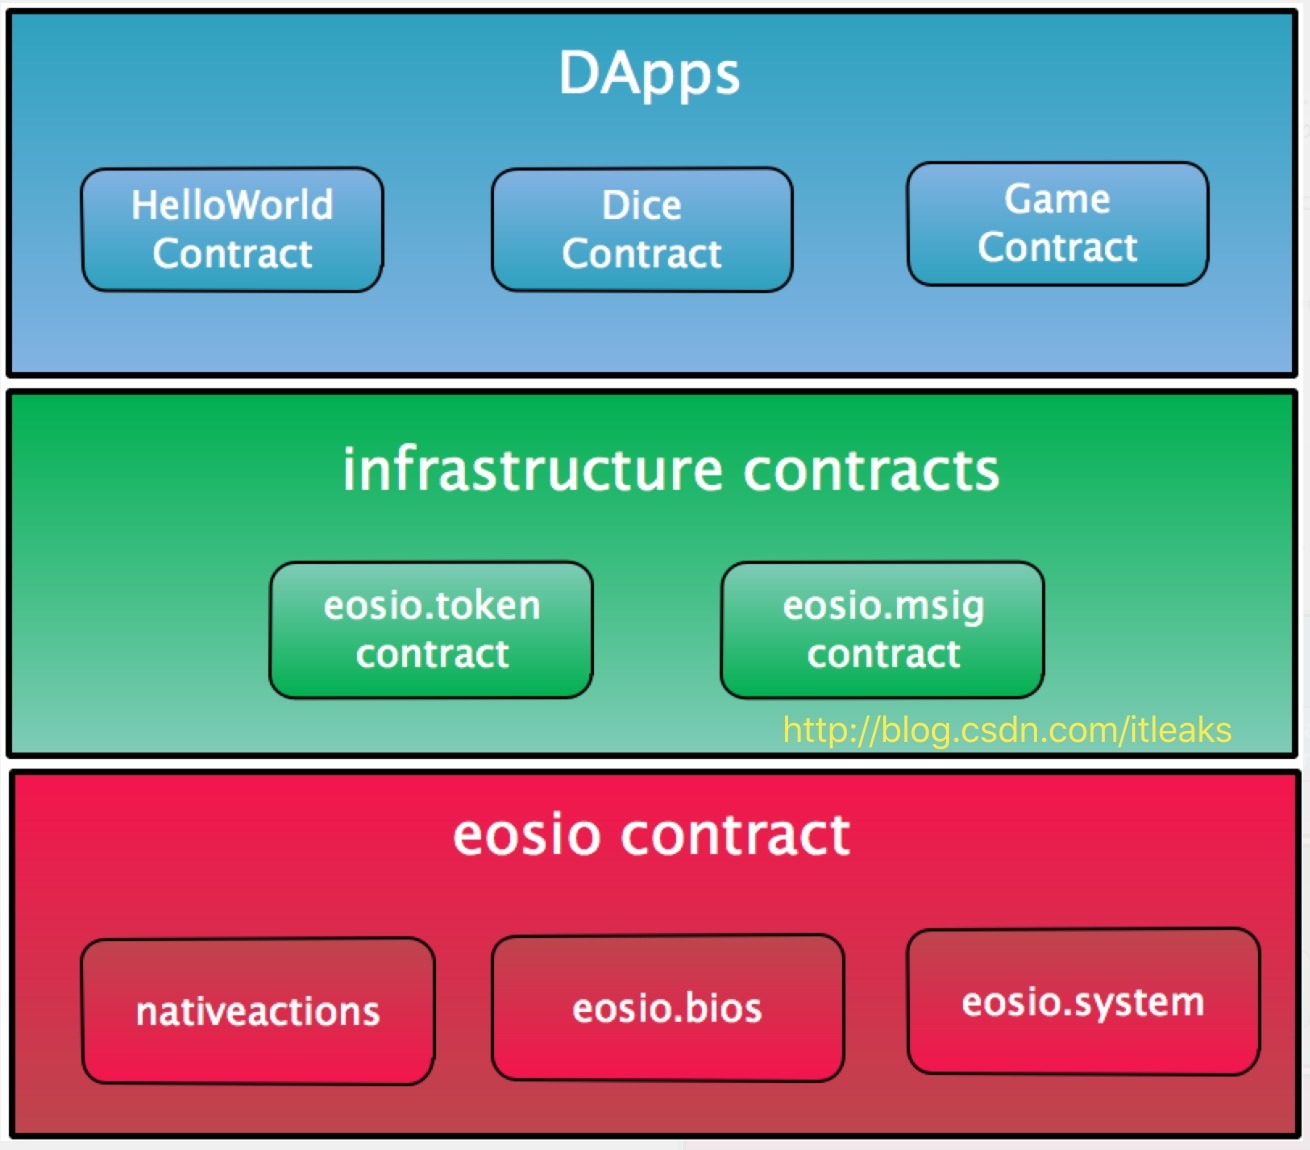
eosio contract负责系统服务,比如部署合约,创建账号。infra contracts层比如eosio.token和eosio.msig类似库作用的合约,比如多签名,发行代币,方便dapp层使用。Dapp才是用户直接接触的,每个开发人员编写程序然后部署,这些程序都是DApp。
eosio contract由3个部分构成
- nativeaction
nativeactions就是前面提到的setcode, setabi, newaccount功能的函数集。这部分代码是hardcode在EOS系统代码里的,也就说不需要部署这一步骤,所以就解决了蛋生鸡,鸡生蛋问题。 - eosio.bios, eosio.system
eosio.bios是一个智能合约的代码,是通过智能合约部署方式绑定到eosio contract上的。那你可能会说,eosio.bios部署后,nativeactions部分是不是就失效了啊。确实可以这样实现,由于setcode这些action需要永久生效,这就需要eosio.bios包含nativeactions这些函数,这样就出现了相同一份代码分散在两个模块,独立性和维护不够好。所以,目前的实现是通过特殊处理让nativeactions的函数有最高优先级,永不覆盖,哪怕eosio.bios实现了同样的函数(比如set_code, set_abi)。但是eosio.system和eosio.bios是一个级别的,都是contract, 是水火不相容的,一旦将eosio.system绑定到eosio这个账号,eosio.bios就失效了,所以eosio.bios的函数要么是临时用途的,要么就需要bios.system重新实现,比如setalimits会失效,而setpriv会在eosio.system重新实现。这个和cpu启动一样,一开始bios(bootloader)代码运行,然后引导system代码,当system加载后,bios(bootloader)代码失效。所以从这个设计和名字可以看出,EOS确实是在按照操作系统的逻辑设计。
eosio.bios的接口EOSIO_ABI( eosio::bios, (setpriv)(setalimits)(setglimits)(setprods)(reqauth) )eosio.sytem的接口
EOSIO_ABI( eosiosystem::system_contract,
(setram)
// delegate_bandwith.cpp
(delegatebw)(undelegatebw)(refund)
(buyram)(buyrambytes)(sellram)
// voting.cpp
// producer_pay.cpp
(regproxy)(regproducer)(unregprod)(voteproducer)
(claimrewards)
// native.hpp
(onblock)
(newaccount)(updateauth)(deleteauth)(linkauth)(unlinkauth)(postrecovery)(passrecovery)(vetorecovery)(onerror)(canceldelay)
//this file
(setpriv)
)
nativeaction解读
-
nativeaction注册
nativeaction是通过SET_APP_HANDLER注册的#define SET_APP_HANDLER( receiver, contract, action) \ set_apply_handler( #receiver, #contract, #action, &BOOST_PP_CAT(apply_, BOOST_PP_CAT(contract, BOOST_PP_CAT(_,action) ) ) ) SET_APP_HANDLER( eosio, eosio, newaccount ); SET_APP_HANDLER( eosio, eosio, setcode ); SET_APP_HANDLER( eosio, eosio, setabi ); SET_APP_HANDLER( eosio, eosio, updateauth ); SET_APP_HANDLER( eosio, eosio, deleteauth ); SET_APP_HANDLER( eosio, eosio, linkauth ); SET_APP_HANDLER( eosio, eosio, unlinkauth ); /* SET_APP_HANDLER( eosio, eosio, postrecovery ); SET_APP_HANDLER( eosio, eosio, passrecovery ); SET_APP_HANDLER( eosio, eosio, vetorecovery ); */ SET_APP_HANDLER( eosio, eosio, canceldelay ); void set_apply_handler( account_name receiver, account_name contract, action_name action, apply_handler v ) { apply_handlers[receiver][make_pair(contract,action)] = v; }对应的函数名是apply_eosio_xxx,比如apply_eosio_setcode,apply_eosio_newaccount
-
nativeaction函数调用
系统会先检测action的名字是否注册在native handler里,如果在则直接调用,不在的话,执行合约代码,并跳转到相应的action函数class apply_context { { public: apply_context(controller& con, transaction_context& trx_ctx, const action& a, uint32_t depth=0) :control(con) ,db(con.db()) ,trx_context(trx_ctx) ,act(a) //合约的账号 ,receiver(act.account) ,used_authorizations(act.authorization.size(), false) } action_trace apply_context::exec_one() { auto start = fc::time_point::now(); const auto& cfg = control.get_global_properties().configuration; try { //获取智能合约对象 const auto &a = control.get_account(receiver); privileged = a.privileged; //检测该action是否是native action,如果是则调用native handler auto native = control.find_apply_handler(receiver, act.account, act.name); if (native) { //hative handler(action)存在,则调用 (*native)(*this); } //只要不是setcode调用,允许nativehandler和contract部署的代码都执行 if( a.code.size() > 0 && !(act.account == config::system_account_name && act.name == N(setcode) && receiver == config::system_account_name) ) { try { control.get_wasm_interface().apply(a.code_version, a.code, *this); } catch ( const wasm_exit& ){} } …. } FC_CAPTURE_AND_RETHROW((_pending_console_output.str())); }转载自:http://blog.csdn.net/itleaks
版权属于:区块链中文技术社区 / 转载原创者
本文链接:https://www.bcskill.com/index.php/archives/171.html
相关技术文章仅限于相关区块链底层技术研究,禁止用于非法用途,后果自负!本站严格遵守一切相关法律政策!