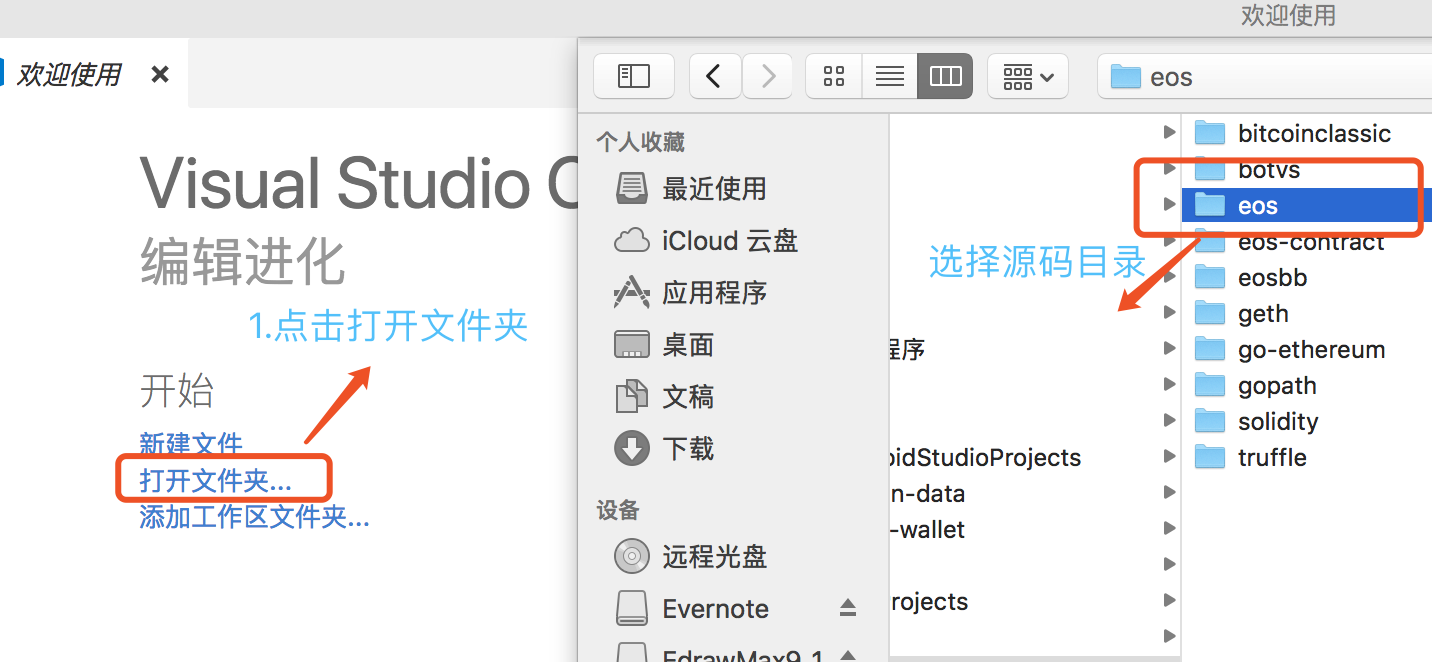
cleos涉及account和contract的命令都会产生一个action,进而生成一个transaction,所有的action都需要指定permission权限
权限验证流程图如下
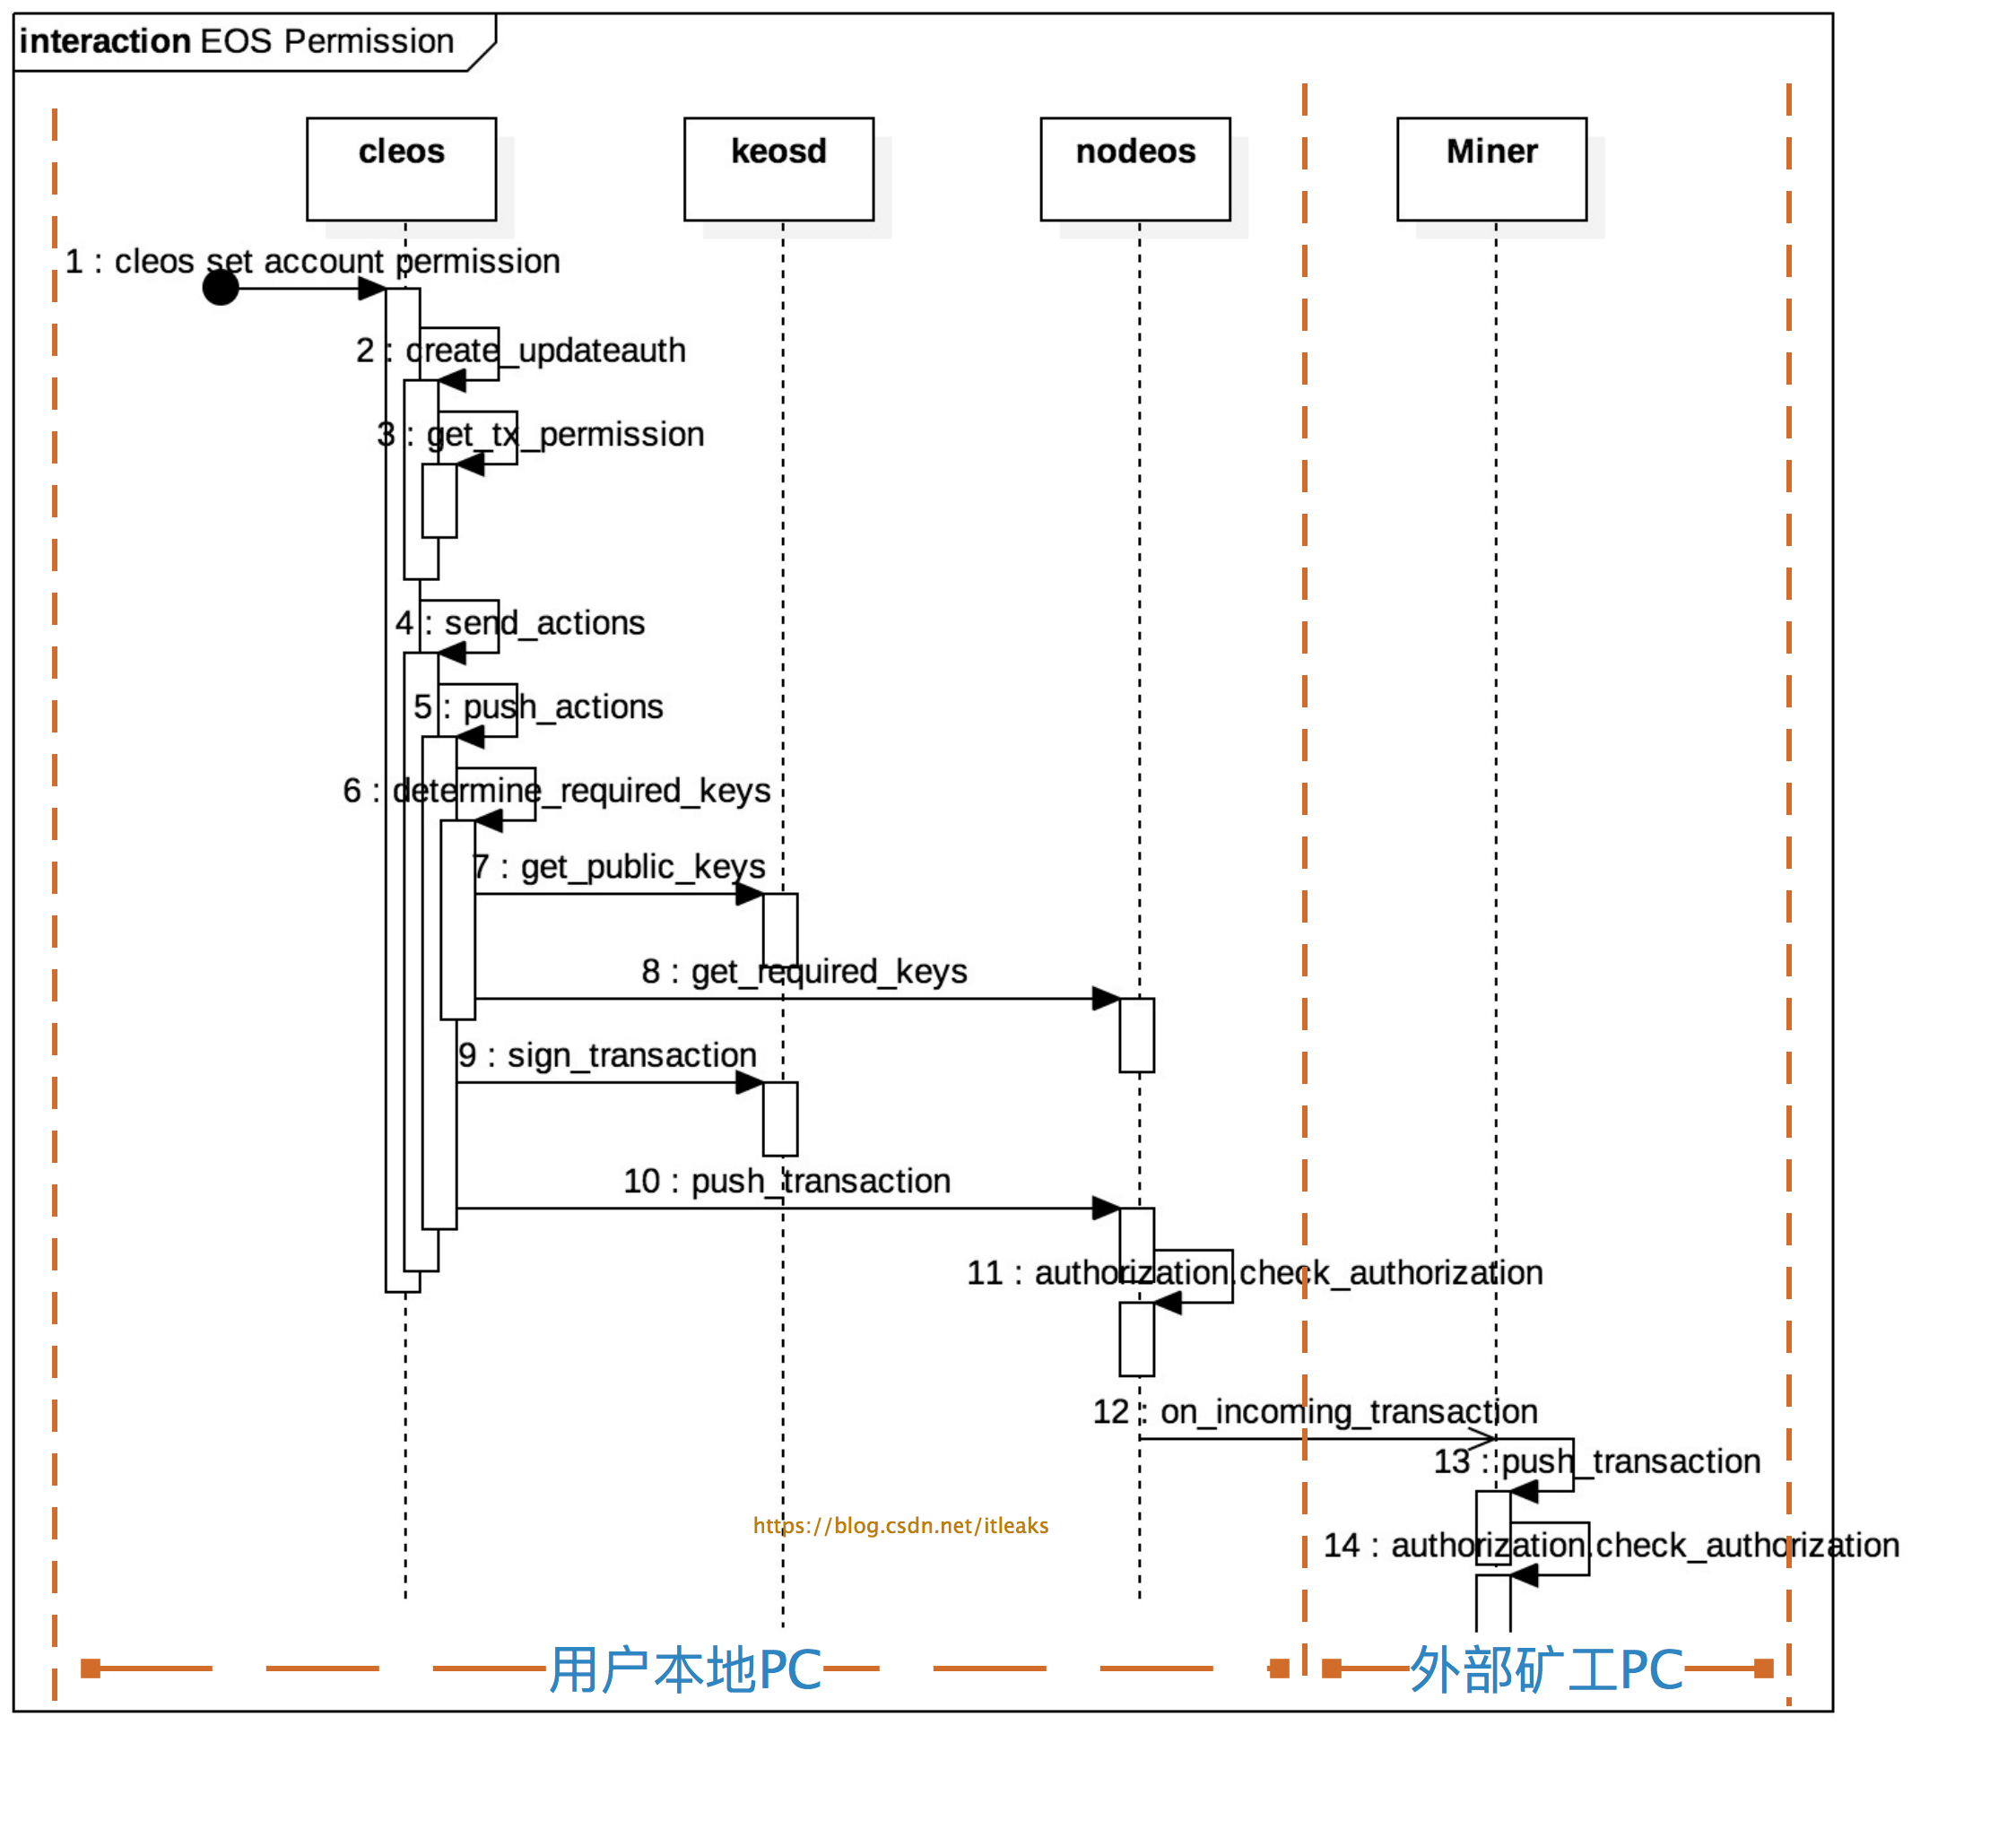
主要分为三个部分:
-
permission声明:1~3
-
permission授权证明:4~9
-
权限检测:10~14,其中本地节点的nodeos和miner节点的nodeos都会执行权限检测,10~11(本地节点)和12~14(外部矿工节点)的工作内容是一样
权限声明
所有action相关命令都是通过通过-p/--permission声明permission参数,permission参数有几种表达形式:account, account@permission, publickey, account等价于account@active
cleos create account -j eosio testaccount -p eosio@owner
cleos set account permission testaccount active -p eosio@active
cleos push action contractaccount method 'data' -p account@publish
cleos push action contractaccount method1 'data' -p publickey
如果用户没有输入该参数,cleos会自动添加默认permission,各种action的默认permission是不一样的
-
create account命令的默认permission是creator@active
-
set account permission命令的默认permission是account@active
-
push action contractaccount命令的默认permission是contractaccount@active
  chain::action create_newaccount(const name& creator, const name& newaccount, public_key_type owner, public_key_type active) {
     return action {
        //tx_permission就是-p参数的值,如果没有account@permission这个值,则默认为creater@active
        tx_permission.empty() ? vector<chain::permission_level>{{creator,config::active_name}} : get_account_permissions(tx_permission),
        eosio::chain::newaccount{
           .creator      = creator,
           .name         = newaccount,
           .owner        = eosio::chain::authority{1, {{owner, 1}}, {}},
           .active       = eosio::chain::authority{1, {{active, 1}}, {}}
        }
     };
  }

  chain::action create_updateauth(const name& account, const name& permission, const name& parent, const authority& auth) {
     return action { tx_permission.empty() ? vector<chain::permission_level>{{account,config::active_name}} : get_account_permissions(tx_permission),
                     updateauth{account, permission, parent, auth}};
  }
如果-p account@permission只带了account,则默认为account@active
vector<chain::permission_level> get_account_permissions(const vector<string>& permissions) {
 auto fixedPermissions = permissions | boost::adaptors::transformed([](const string& p) {
    vector<string> pieces;
    split(pieces, p, boost::algorithm::is_any_of("@"));
    //如果没有@permission这个声明,则默认为@active
    if( pieces.size() == 1 ) pieces.push_back( "active" );
    return chain::permission_level{ .actor = pieces[0], .permission = pieces[1] };
 });
 vector<chain::permission_level> accountPermissions;
 boost::range::copy(fixedPermissions, back_inserter(accountPermissions));
 return accountPermissions;
}
权限授权证明
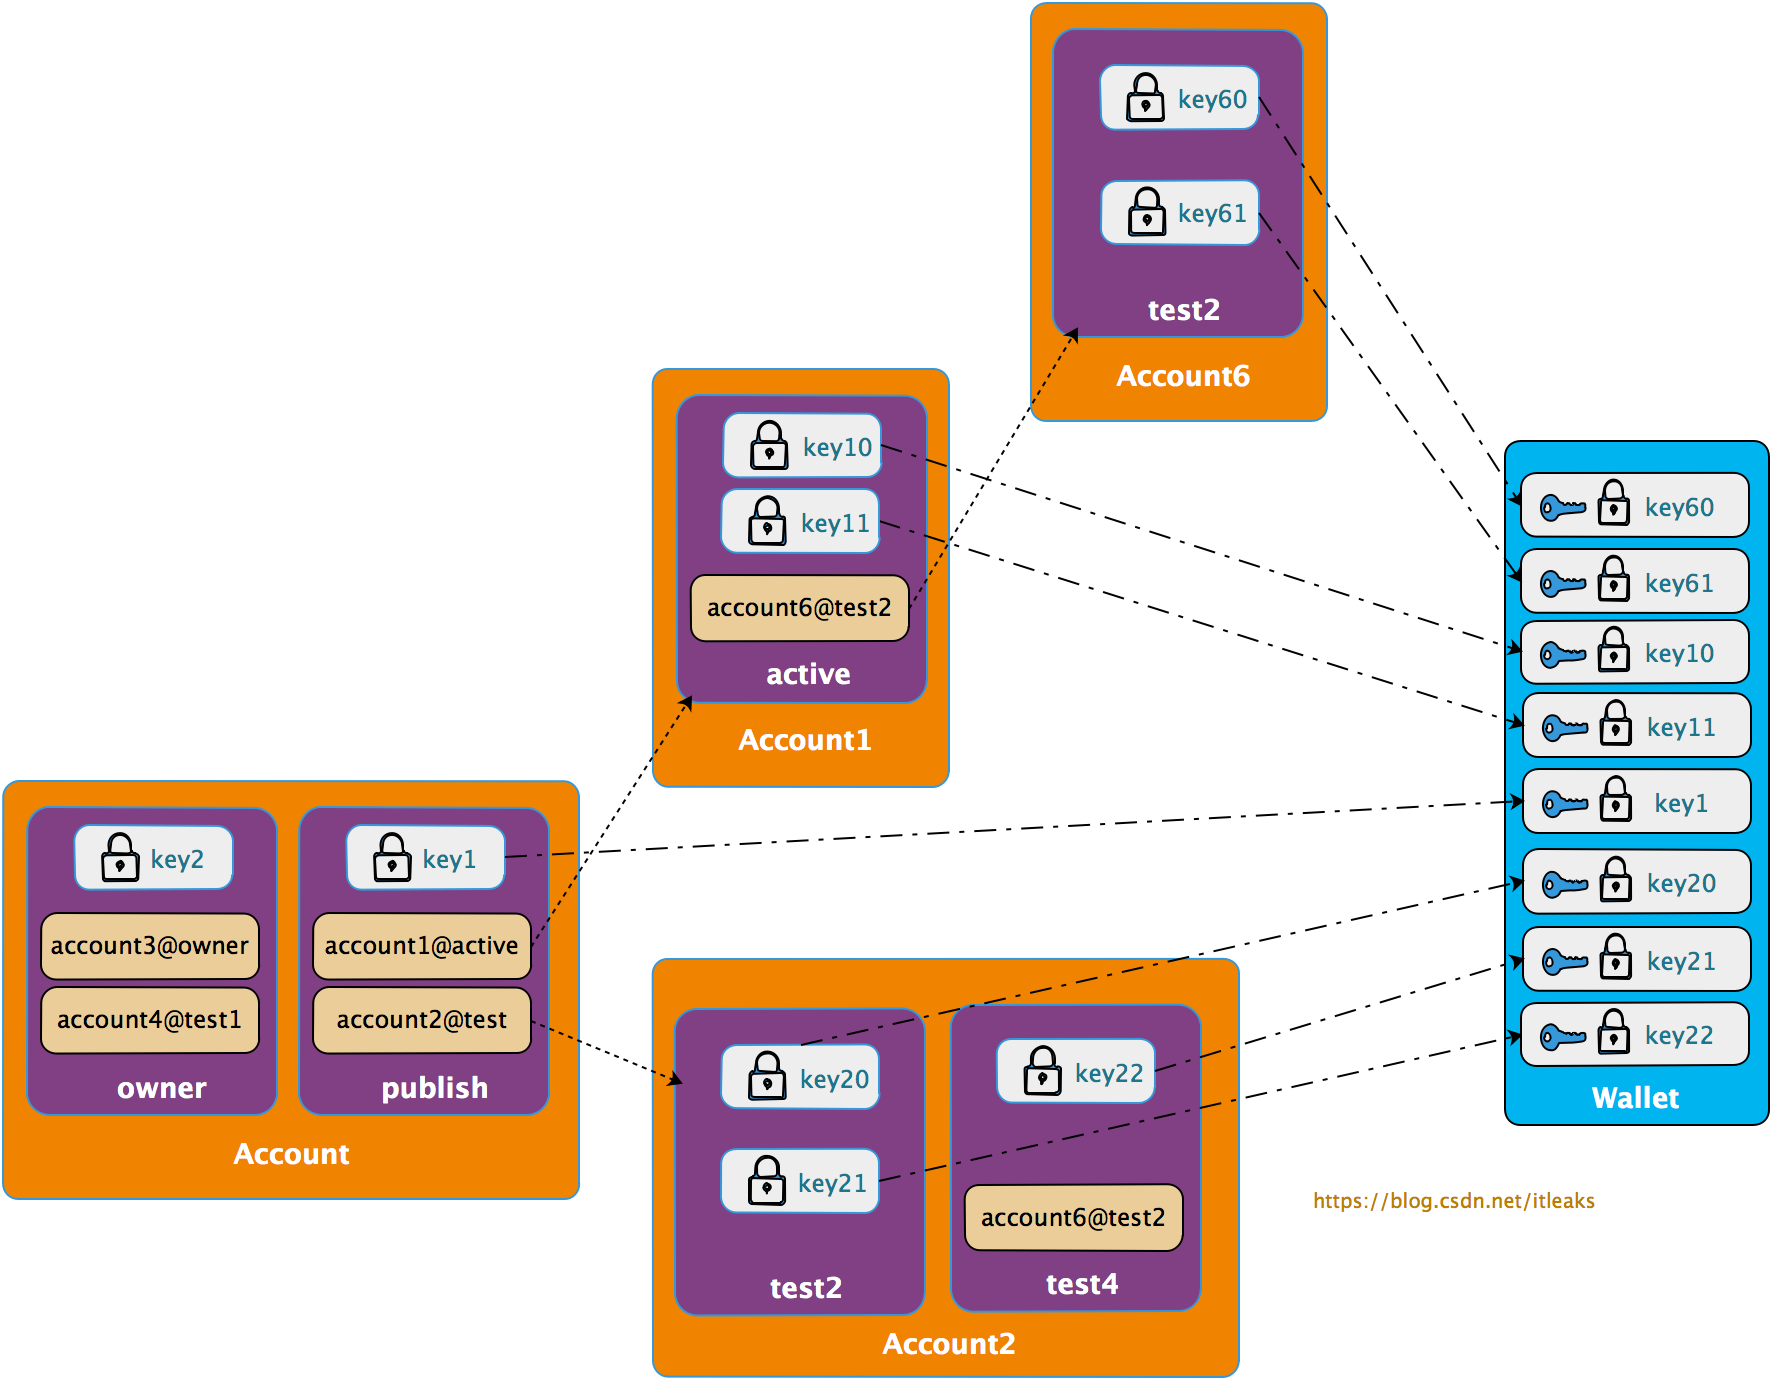
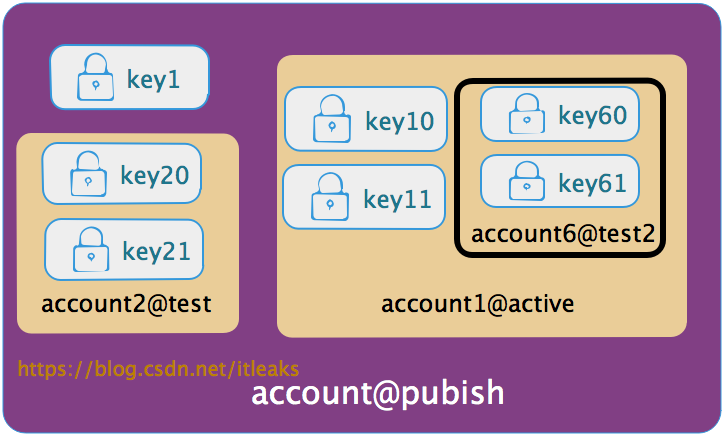
用户在执行cleos相关命令时通过-p声明了permission,这个permission只是一个字符串,谁都可以伪造的,因而需要提交真实可验证的证据,这个证据就是permission的授权(authority)信息。一个permission的authority可以是public key,也可以是子permission(另一个账号的permission, anotheraccount@permission), 这样就形成了一颗树, 叶子节点是public key, 只有该叶子节点的public key才有该权限。
所以提交授权证明的过程由两部分构成
收集权限permission的public key
搜集permission生成的授权树的叶子节点的public key,即找出哪些public key被授予该权限
比如上图的account@publish权限展开后得到如下叶子节点public key集合【key1, key10, key11, key20, key21, key60, key61】,只要用户拥有这些key集合中的一个public key对应的私钥就可以证明该用户可以以该account@publish权限提交action.
cleos端:
  fc::variant push_transaction( signed_transaction& trx, int32_t extra_kcpu = 1000, packed_transaction::compression_type compression = packed_transaction::none ) {
     auto required_keys = determine_required_keys(trx);
  }

  fc::variant determine_required_keys(const signed_transaction& trx) {
     // TODO better error checking
     //wdump((trx));
     //拿到本地所有的public keys,这些key中可能拥有account@publish权限
     const auto& public_keys = call(wallet_url, wallet_public_keys);
     //trx包含action,action包含account@publish权限信息
     auto get_arg = fc::mutable_variant_object
             ("transaction", (transaction)trx)
             ("available_keys", public_keys);
     //调用keosd的服务获取本地满足account@publish权限的public key
     const auto& required_keys = call(get_required_keys, get_arg);
     return required_keys["required_keys"];
  }
nodeos端:
flat_set<public_key_type> authorization_manager::get_required_keys( const transaction& trx,
const flat_set<public_key_type>& candidate_keys,
fc::microseconds provided_delay)const
 {
    auto checker = make_auth_checker( [&](const permission_level& p){ return get_permission(p).auth; },
                                      _control.get_global_properties().configuration.max_authority_depth,
                                      candidate_keys,
                                      {},
                                      provided_delay,
                                      _noop_checktime
                                    );

    for (const auto& act : trx.actions ) {
       for (const auto& declared_auth : act.authorization) {
          //判断candidate_keys是否有合适的key被授予了act.authorization
          EOS_ASSERT( checker.satisfied(declared_auth), unsatisfied_authorization,
                      "transaction declares authority '${auth}', but does not have signatures for it.",
                      ("auth", declared_auth) );
       }
    }
    //返回满足条件的public key
    return checker.used_keys();
 }
通过私钥签名提供授权证明
搜索上一步收集到的public key,检测是否含有本用户的key,如果存在,则用相应的private key 签名交易,这样就可以证明该交易的具备account@publish这一permission
  fc::variant push_transaction( signed_transaction& trx, int32_t extra_kcpu = 1000, packed_transaction::compression_type compression = packed_transaction::none ) {
     //上一步获取到的被授权的public key
     auto required_keys = determine_required_keys(trx);
     if (!tx_skip_sign) {
        //通过签名交易提交permission证明
        sign_transaction(trx, required_keys);
     }

     if (!tx_dont_broadcast) {
        //广播交易
        return call(push_txn_func, packed_transaction(trx, compression));
     } else {
        return fc::variant(trx);
     }
  }

  void sign_transaction(signed_transaction& trx, fc::variant& required_keys) {
     // TODO determine chain id
     fc::variants sign_args = {fc::variant(trx), required_keys, fc::variant(chain_id_type{})};
     //cleos调用keosd的sign_trx api来执行签名操作
     const auto& signed_trx = call(wallet_url, wallet_sign_trx, sign_args);
     trx = signed_trx.as<signed_transaction>();
  }

  chain::signed_transaction
  wallet_manager::sign_transaction(const chain::signed_transaction& txn, const flat_set<public_key_type>& keys, const chain::chain_id_type& id) {
     check_timeout();
     chain::signed_transaction stxn(txn);

     for (const auto& pk : keys) {
        bool found = false;
        for (const auto& i : wallets) {
           if (!i.second->is_locked()) {
              //根据public key拿到private key并签名,这个是没法伪造的
              const auto& k = i.second->try_get_private_key(pk);
              if (k) {
                 stxn.sign(*k, id);
                 found = true;
                 break; // inner for
              }
           }
        }
     }

     return stxn;
  }
节点验证权限授权证明
用权限permission授权的私钥签名(授权证明)的交易发布到网络后,矿工收到该交易后,还需要解释签名并验证权限。验证分为两部分
-
声明的权限是否满足action的最低权限要求
transaction_trace_ptr push_transaction( const transaction_metadata_ptr& trx,
                                         fc::time_point deadline,
                                         bool implicit,
                                         uint32_t billed_cpu_time_us  )
 {
    FC_ASSERT(deadline != fc::time_point(), "deadline cannot be uninitialized");

    transaction_trace_ptr trace;
    try {
          if (!implicit) {
             //检验权限和
             authorization.check_authorization(
                     trx->trx.actions,
                     trx->recover_keys(),
                     {},
                     trx_context.delay,
                     [](){}
          }

    } FC_CAPTURE_AND_RETHROW((trace))
 } /// push_transaction

   //从签名里获取action发起者拥有的public key
    const flat_set<public_key_type>& recover_keys() {
       // TODO: Update caching logic below when we use a proper chain id setup for the particular blockchain rather than just chain_id_type()
       if( !signing_keys )
          signing_keys = trx.get_signature_keys( chain_id_type() );
       return *signing_keys;
    }
  void
     authorization_manager::check_authorization( const vector<action>&                actions,
                                                 const flat_set<public_key_type>&     provided_keys,
                                                 const
  flat_set<permission_level>&    provided_permissions,
                                                )const
     {
        map<permission_level, fc::microseconds> permissions_to_satisfy;

        for( const auto& act : actions ) {
           bool special_case = false;
           fc::microseconds delay = effective_provided_delay;

           if( act.account == config::system_account_name ) {
              special_case = true;
              //系统级action,比如修改权限的授权,链接授权等action,它的执行权限permission是固定的,需要在这里检测签名的keys是否具备相应的permission
              if( act.name == updateauth::get_name() ) {
                 check_updateauth_authorization( act.data_as<updateauth>(), act.authorization );
              } else if( act.name == deleteauth::get_name() ) {
                 check_deleteauth_authorization( act.data_as<deleteauth>(), act.authorization );
              ……..
              }
           }

           //authorization
           //其他action,检测授权是否正确
           for( const auto& declared_auth : act.authorization ) {
              //对于上面的case,这里的declared_auth=account@publish
              checktime();

              if( !special_case ) {
                 //获取该action需要的最低权限
                 auto min_permission_name = lookup_minimum_permission(declared_auth.actor, act.account, act.name);
                 if( min_permission_name ) { // since special cases were already handled, it should only be false if the permission is eosio.any
                    //从区块中取出最低权限数据
                    const auto& min_permission = get_permission({declared_auth.actor, *min_permission_name});
                    //比较声明的权限是否满足最低权限
                    EOS_ASSERT( get_permission(declared_auth).satisfies( min_permission,
                                                                         _db.get_index<permission_index>().indices() ),
                                irrelevant_auth_exception,
                                "action declares irrelevant authority '${auth}'; minimum authority is ${min}",
                                ("auth", declared_auth)("min", permission_level{min_permission.owner, min_permission.name}) );
                 }
              }

     }
声明的权限的授权签名是否正确
void
 authorization_manager::check_authorization( const vector<action>&                actions,
                                             const flat_set<public_key_type>&     provided_keys,
                                             const flat_set<permission_level>&    provided_permissions,
                                            )const
 {
   auto checker = make_auth_checker( [&](const permission_level& p){ return get_permission(p).auth; },
                                      _control.get_global_properties().configuration.max_authority_depth,
                                      provided_keys,
                                      provided_permissions,
                                      effective_provided_delay,
                                      checktime
                                    );
  …..
  for( const auto& p : permissions_to_satisfy ) {
       checktime(); // TODO: this should eventually move into authority_checker instead
       //验证
       EOS_ASSERT( checker.satisfied( p.first, p.second ), unsatisfied_authorization,
                   "transaction declares authority '${auth}', "
                   "but does not have signatures for it under a provided delay of ${provided_delay} ms",
                   ("auth", p.first)("provided_delay", provided_delay.count()/1000)
                   ("delay_max_limit_ms", delay_max_limit.count()/1000)
                 );

    }
权限验证实例
修改权限,命令如下:
$cleos set account permission testaccount active '{"threshold" : 1, "keys" : [], "accounts" : [{"permission":{"actor":"bob","permission":"active"},"weight":1}, {"permission":{"actor":"stacy","permission":"active"},"weight":1}]}’ owner
该命令没有添加permission参数,cleos会自动添加默认权限声明,其等价于
$cleos set account permission testaccount active '{"threshold" : 1, "keys" : [], "accounts" : [{"permission":{"actor":"bob","permission":"active"},"weight":1}, {"permission":{"actor":"stacy","permission":"active"},"weight":1}]}’ owner
-p testaccount@active
-p testaccount@active是cleos自动补全的
该action打包到transaction然后进入到了某一个矿工节点,然后就会执行上面的authorization_manager::check_authorization函数来验证权限,而对于该系统action,会调用check_updateauth_authorization来检验
void authorization_manager::check_updateauth_authorization( const updateauth& update,
                                                             const vector<permission_level>& auths
                                                           )const
 {
    EOS_ASSERT( auths.size() == 1, irrelevant_auth_exception,
                "updateauth action should only have one declared authorization" );
    const auto& auth = auths[0];
    EOS_ASSERT( auth.actor == update.account, irrelevant_auth_exception,
                "the owner of the affected permission needs to be the actor of the declared authorization" );
    //检测对应的permission是否存在
    const auto* min_permission = find_permission({update.account, update.permission});
    if( !min_permission ) { // creating a new permission
       //不存在则以父permission为min_permission检测
       min_permission = &get_permission({update.account, update.parent});
    }
    //示例中,testaccount.active存在,所以min_permission=testaccount@active
    //声明的也是testaccount@ative,所以能通过验证
    EOS_ASSERT( get_permission(auth).satisfies( *min_permission,
                                                _db.get_index<permission_index>().indices() ),
                irrelevant_auth_exception,
                "updateauth action declares irrelevant authority '${auth}'; minimum authority is ${min}",
                ("auth", auth)("min", permission_level{update.account, min_permission->name}) );
 }
contract函数执行类型的action, 权限检测由contract代码激发,比如下面的例子
void hi( account_name user ) {
 require_auth( user );
 print( "Hello, ", name{user} );
}
require_auth(user)就会激发对‘user@active’权限的检测