简介
Traefik是一个反向代理和负载均衡器,主要用于云原生场景,可自动识别Kubernetes、Docker、Docker Swarm等等技术下部署的服务,通过label标签自动生成反向代理路由规则。Traefik Github仓库 star是42.6k,官方文档地址:doc.traefik.io/traefik/
Nginx Proxy Manager 基于Nginx提供了一个管理后台,用户可以很轻松的对Nginx进行可视化的配置,内置了ssl 证书的自动化生成和管理。NPM Github仓库star是12.9k,官方文档地址:nginxproxymanager.com/
初体验环境说明
初次使用主要体验Traefik和NPM的基本功能,所以使用docker compose 方式快速搭建环境。
自定义网络
从 Docker 1.10 版本开始,docker daemon 实现了一个内嵌的 DNS server,使容器可以直接通过容器名称通信,但是需要使用自定义的网络。 所以这里我们先创建自定义网络: custom_net
docker create network custom_network #默认是bridge桥接网络当然,也可以直接在docker compose yaml中定义,让它自行生成
# 创建自定义网络
networks:
  custom_net:
    driver: bridge
    name: custom_net

# 引入已创建好的网络
#networks:
#  custom_net:
#    external: true
Traefik 使用
Traefik的配置分为静态配置和动态配置
- 静态配置一般使用命令行参数,一次配置后基本不用修改
- 动态配置用于配置路由规则、中间件(处理/转换请求)、负载均衡等,支持Docker、File、Ingress、Consul、Etcd、ZooKeeper、Redis、Http等多种方式
docker compose 配置如下:
version: "3"
services:
  traefik:
    image: traefik:2.9
    command:
      - "--log.level=DEBUG"
      - "--api.insecure=true"
      - "--api.dashboard=true"
      - "--providers.docker=true"
      - "--providers.file.directory=/traefik/conf"
      - "--providers.file.watch=true"
      - "--providers.docker.exposedByDefault=false"
    ports:
      # The HTTP port
      - "80:80"
      # The Web UI (enabled by --api)
      - "81:8080"
    environment:
      TZ: Asia/Shanghai
    volumes:
      # So that Traefik can listen to the Docker events
      - "/var/run/docker.sock:/var/run/docker.sock:ro"
      - "/root/docker/traefik/conf:/traefik/conf"
    networks:
      - custom_net

# 引入已创建好的网络
networks:
  custom_net:
    external: true
配置说明
- api.dashboard=true 开启dashboard管理台,方便查看生效的配置
- providers.docker=true 开启docker容器label自动感知
- providers.docker.exposedByDefault=false 关闭无label的感知
- providers.file.watch=true 开启File文件模式的动态配置感知
- providers.file.directory 配置动态配置的文件路径
以上配置主要是方便接下来以Docker和File两种方式来演示Traefik自动创建路由转发规则
Dashboard展示
配置好后yaml后,使用docker compose up -d启动,访问http://localhost:81/dashboard 查看Dashboard面板
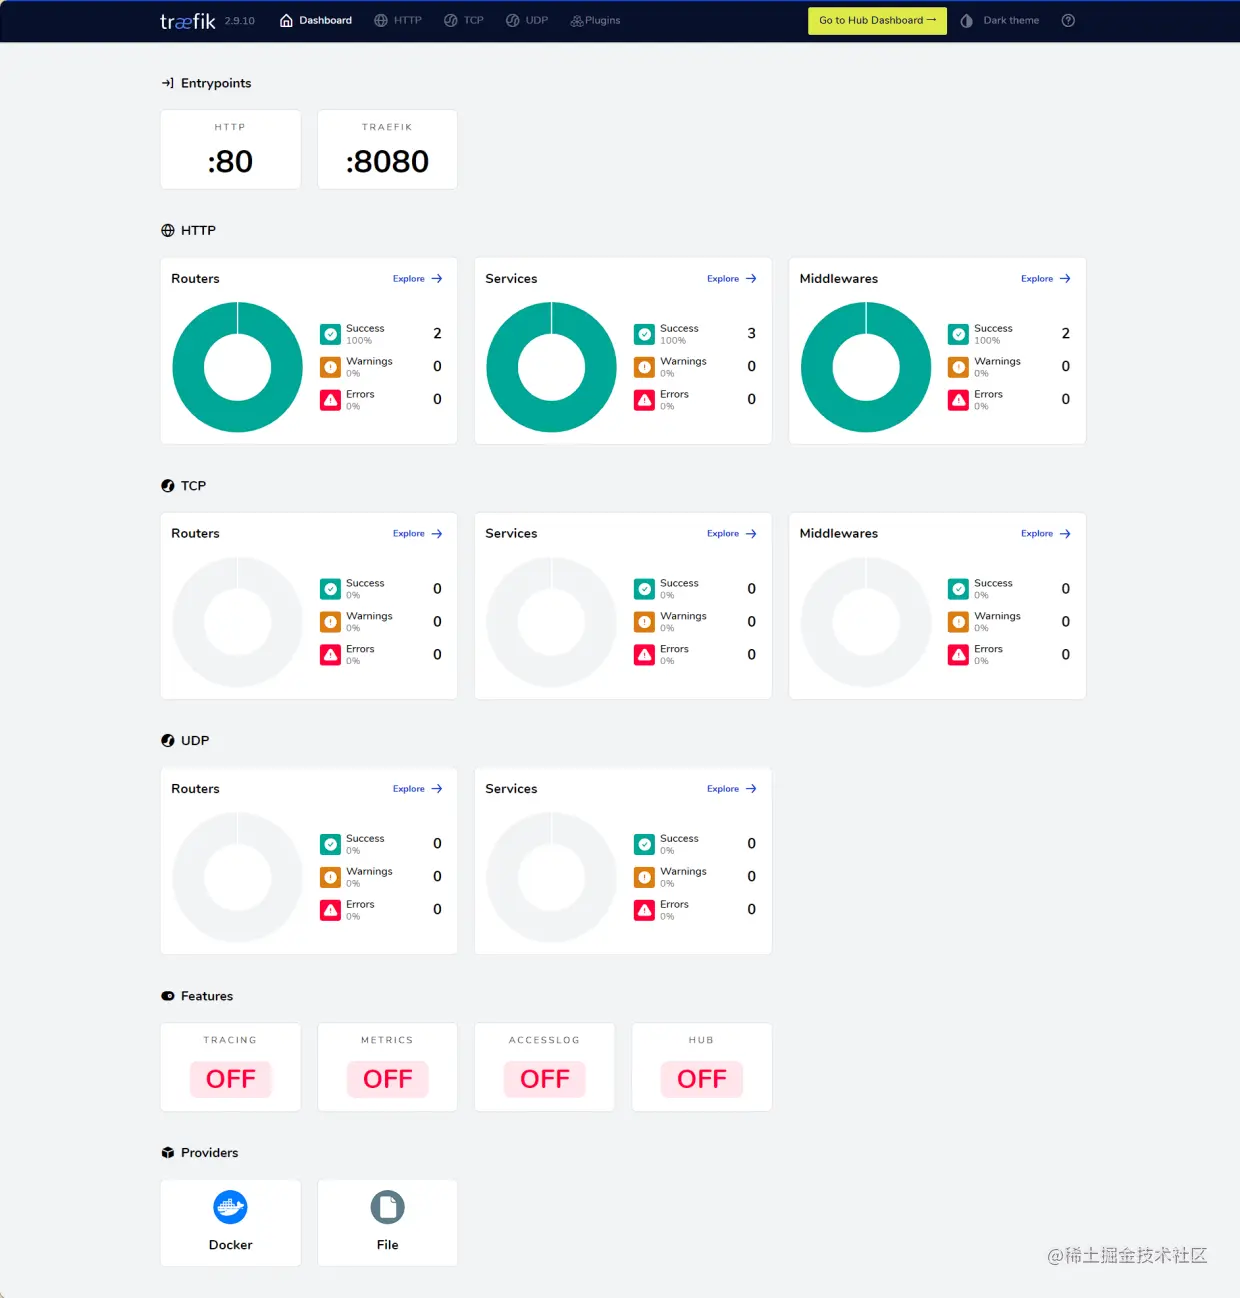
- Providers中Docker、File说明开启了这2种动态配置
- Entrypoints的80和8080是Traefik的流量入口
- HTTP、TCP、UDP三种路由规则的可视化
- Features是Traefik自身的功能:链路追踪、监控指标、访问日志、Hub扩展能力
Docker label自动感知
以官方的whoami镜像测试
version: '3'
services:
  whoami:
    # A container that exposes an API to show its IP address
    image: traefik/whoami
    labels:
      - "traefik.enable=true"
      - "traefik.http.routers.whoami.rule=PathPrefix(`/test`)"
    networks:
      - custom_net
# 引入已创建好的网络
networks:
  custom_net:
    external: true
只需要配置lables ,容器启动后,Traefik即可自动感知并添加路由转发规则 /test -> whoami 容器
PathPrefix匹配以xxx开头的请求,更多匹配规则可查询Traefik官方-Routers配置
从dashboard中可以看到流量路由的流转情况:
从Traefik的80端口为入口,经过/test为前缀匹配的HTTP Router,到达whoami容器服务Service暴露的80端口
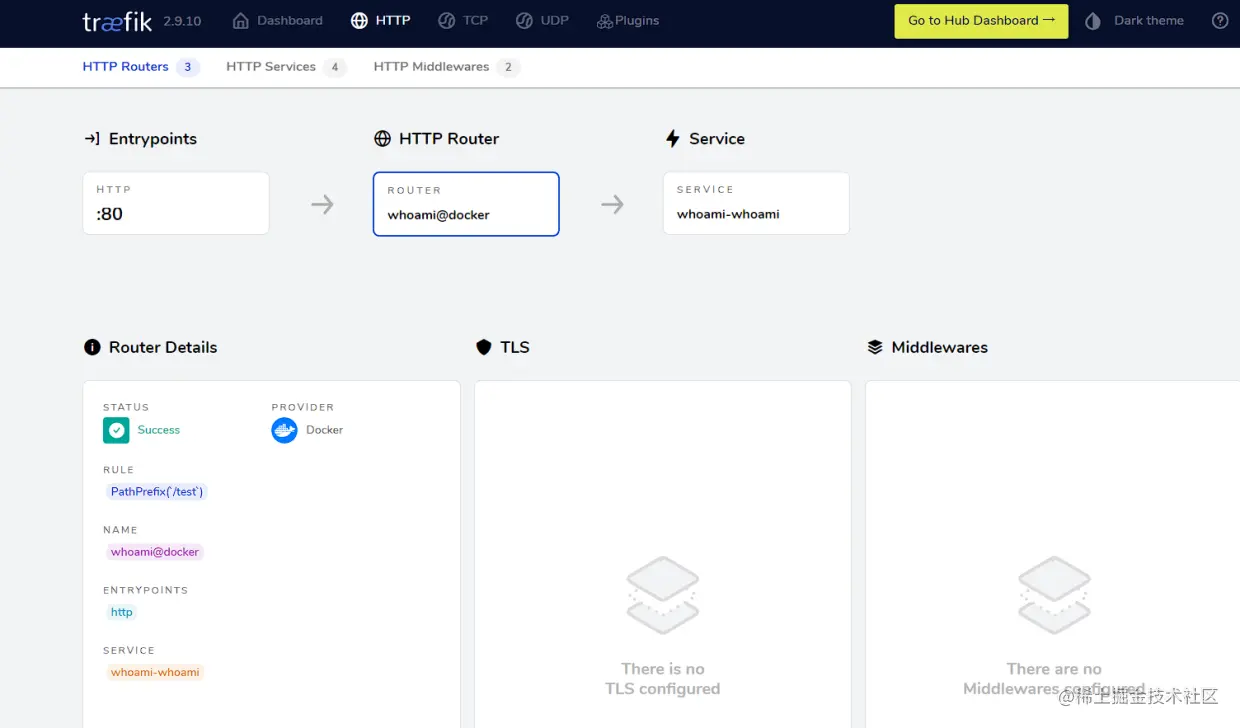
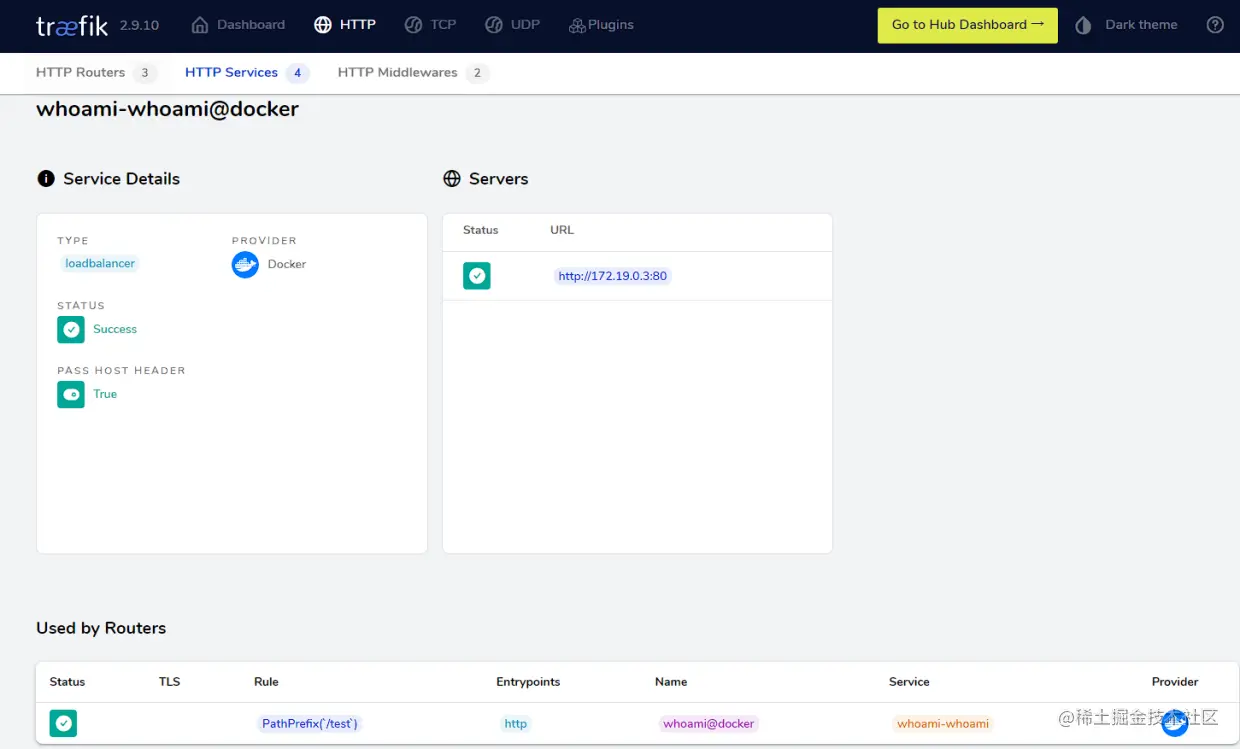
因为Traefik和whoami同一网络下(custom_net),所以whoami不需要对外暴露业务端口,Traefik会自动转到whoami的容器内端口。
上面的yaml配置中并没有暴露whoami的端口
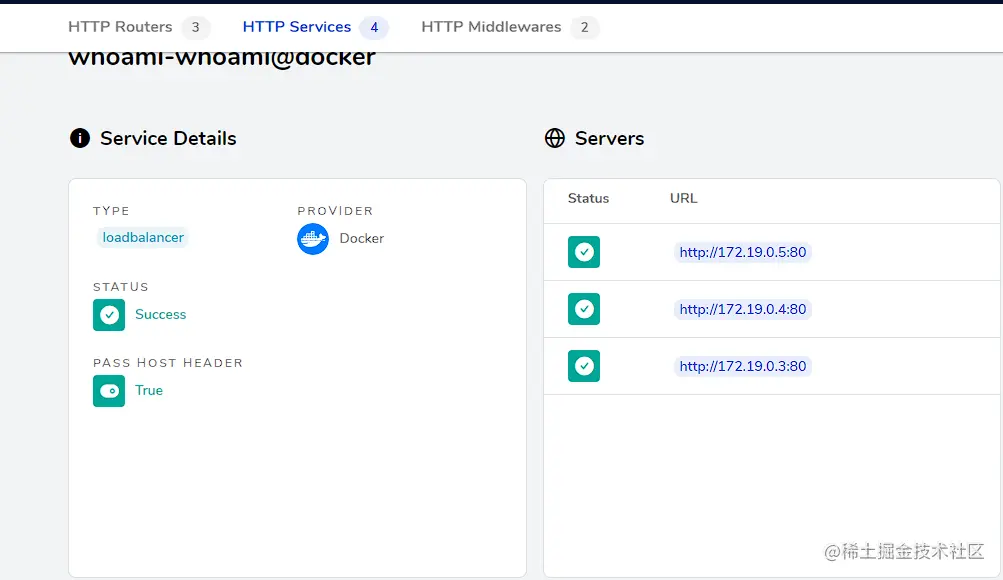
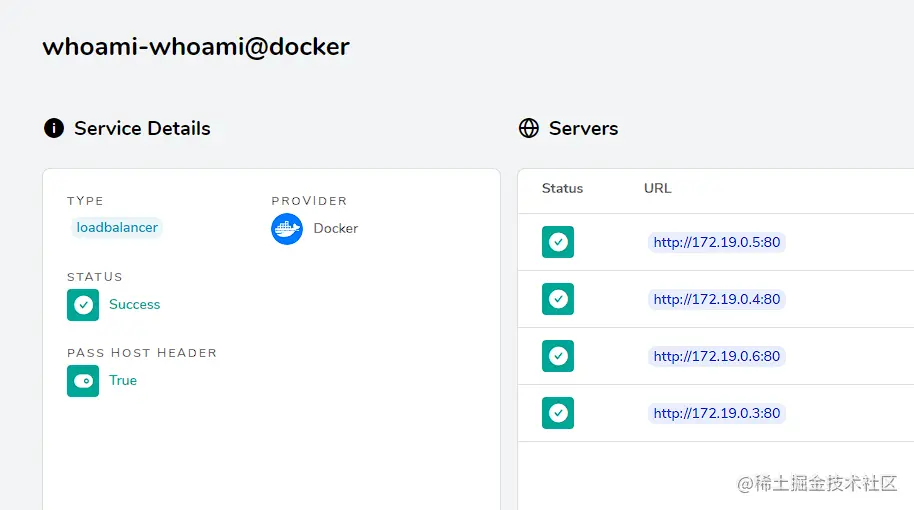
Traefik也可以自动识别多个实例,自动完成负载均衡。
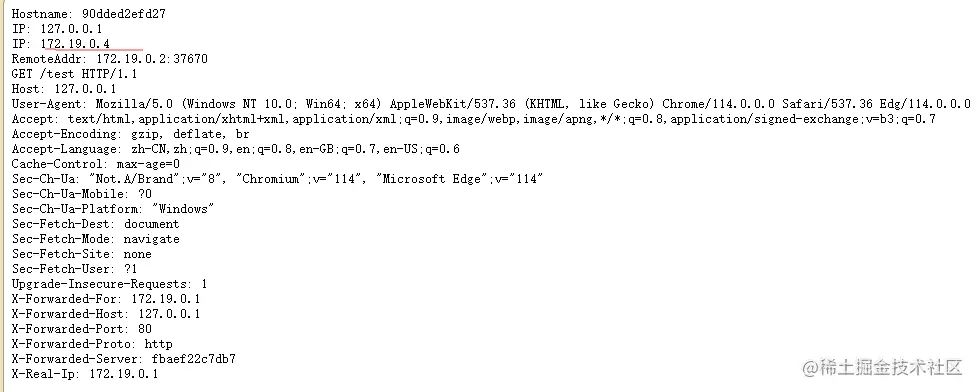
使用docker compose up -d --scale whoami=3 扩容到3个whoami容器,然后多次访问http://127.0.0.1/test,从返回的信息里面可以看到会轮询调用whoami容器

如果是直接使用docker run启动容器,可以这样加label
docker run -d --label 'traefik.http.routers.whoami.rule=PathPrefix(`/test`)' \
 --label traefik.enable=true \
 --network mynet \
 --name whoami-whoami traefik/whoami
docker compose中启动的容器名为工程名称-服务条目名称-序号,这里--name whoami-whoami 是为了让docker run启动的容器自动归类到上面docker compose启动的services中
File配置文件动态感知
前面介绍了Docker label的方式自动添加路由规则到Traefik,现在也介绍一下File文件的方式。
Traefik会自动watch静态配置providers.file.directory=/traefik/conf路径,可以将其挂载出来/root/docker/traefik/conf:/traefik/conf,然后在conf下新增yaml文件即可
swagger.yaml
http:
  routers:
    s-user:
      service: s-user
      middlewares:
        - "replaceRegex1"
      rule: PathPrefix(`/s-user`)
    s-order:
      service: s-order
      middlewares:
        - "replaceRegex2"
      rule: PathPrefix(`/s-order`)
    s-product:
      service: s-product
      middlewares:
        - "replaceRegex3"
      rule: PathPrefix(`/s-product`)

  middlewares:
    replaceRegex1:
      replacePathRegex:
        regex: "^/s-user/(.*)"
        replacement: "/$1"
    replaceRegex2:
      replacePathRegex:
        regex: "^/s-order/(.*)"
        replacement: "/$1"
    replaceRegex3:
      replacePathRegex:
        regex: "^/s-product/(.*)"
        replacement: "/$1"

  services:
    s-user:
      loadBalancer:
        servers:
        - url: http://swagger-user:8080
    s-order:
      loadBalancer:
        servers:
        - url: http://swagger-order:8080
    s-product:
      loadBalancer:
        servers:
        - url: http://swagger-product:8080
配置解释:
routers 配置url匹配规则,PathPrefix是前缀匹配
middlewares 配置中间件,处理url路径;replacePathRegex是官方提供的用于正则转换,以replaceRegex1为例,将/s-user/ 这一段替换为 /
services 配置负载均衡,swagger-user为docker compose中配置的服务,利用Docker自带的DNS功能,通过服务名访问容器
上面配置的作用:即通过Traefik将80端口的请求url /s-user/xxx 替换为 /xxx ,转发到容器内部的swagger-user服务的8080端口
示例中的后端服务是3个swagger-ui镜像服务,启动后会读取xx.json内容形成swagger接口文档,此处不关注xx.json的具体内容,仅作用法参考
version: '3'
services:
  swagger-user:
    image: 'swaggerapi/swagger-ui'
    ports:
      - '8083:8080'
    environment:
      SWAGGER_JSON: /swagger/user.json
    volumes:
      - /mnt/d/docker/swagger-json:/swagger
    networks:
      - custom_net

  swagger-order:
    image: 'swaggerapi/swagger-ui'
    ports:
      - '8085:8080'
    environment:
      SWAGGER_JSON: /swagger/order.json
    volumes:
      - /mnt/d/docker/swagger-json:/swagger
    networks:
      - custom_net

  swagger-product:
    image: 'swaggerapi/swagger-ui'
    ports:
      - '8084:8080'
    environment:
      SWAGGER_JSON: /swagger/product.json
    volumes:
      - /mnt/d/docker/swagger-json:/swagger
    networks:
      - custom_net

networks:
  custom_net:
    external: true
其他动态配置如使用Etcd、Consul、ZooKeeper,配置格式与File类似。
File文件配置支持Traefik和业务服务都不重启的情况下动态生效路由配置,File watch底层是使用fsnotify,对于少数系统不支持动态感知,如windows wsl ubuntu
Nginx Proxy Manager 使用
NPM需要用到数据库来存储代理转发规则等数据,控制台支持禁用某个路由转发规则,其实就是通过数据库来暂存配置数据实现。 这里直接使用MySQL来初体验。docker-compose.yaml内容如下:
version: '3'
services:
  nginx-proxy-manager:
    image: 'jc21/nginx-proxy-manager:latest'
    restart: always
    ports:
      # These ports are in format <host-port>:<container-port>
      - '80:80' # Public HTTP Port
      - '443:443' # Public HTTPS Port
      - '81:81' # Admin Web Port
      # Add any other Stream port you want to expose
      # - '21:21' # FTP
    environment:
      # Mysql/Maria connection parameters:
      DB_MYSQL_HOST: mysql
      DB_MYSQL_PORT: 3306
      DB_MYSQL_USER: "npm"
      DB_MYSQL_PASSWORD: "npm"
      DB_MYSQL_NAME: "npm"
      # Uncomment this if IPv6 is not enabled on your host
      # DISABLE_IPV6: 'true'
      TZ: Asia/Shanghai
    volumes:
      - ./data:/data
      - ./letsencrypt:/etc/letsencrypt
    networks:
      - custom_net
    depends_on:
      - mysql

  mysql:
    image: mysql:5.7.16
    container_name: mysql
    restart: always
    ports:
      - "3306:3306"
    volumes:
      - /mnt/d/docker/docker-compose/mysql/data:/var/lib/mysql
    environment:
      MYSQL_ROOT_PASSWORD: "123456"
      TZ: Asia/Shanghai
    #最大内存限制
    deploy:
      resources:
        limits:
          memory: 256M
    networks:
      - custom_net
    privileged: true
    command:
      --server_id=100
      --log-bin=mysql-bin
      --binlog_format=mixed
      --expire_logs_days=7
      --default-authentication-plugin=mysql_native_password
      --character-set-server=utf8mb4
      --collation-server=utf8mb4_general_ci
      --max_allowed_packet=16M
      --sql_mode=STRICT_TRANS_TABLES,NO_ZERO_IN_DATE,NO_ZERO_DATE,ERROR_FOR_DIVISION_BY_ZERO,NO_AUTO_CREATE_USER,NO_ENGINE_SUBSTITUTION
      --max_connections=10000
      --slow_query_log=ON
      --long_query_time=1
      --log_queries_not_using_indexes=ON
      --lower_case_table_names=1
      --explicit_defaults_for_timestamp=true

# 引入已创建好的网络
networks:
  custom_net:
    external: true
使用docker compose up -d启动后,记得先进入MySQL创建用户、账号、密码、数据库,都是叫npm
可以通过NPM环境变量中的DB_MYSQL_USER、DB_MYSQL_NAME等配置自行指定 因为在同一容器网络下DB_MYSQL_HOST可以直接使用mysql访问
启动完成后,可以访问localhost:81 进入控制台,首次登录需要修改账号/密码。默认的账号/密码是admin@example.com/changeme
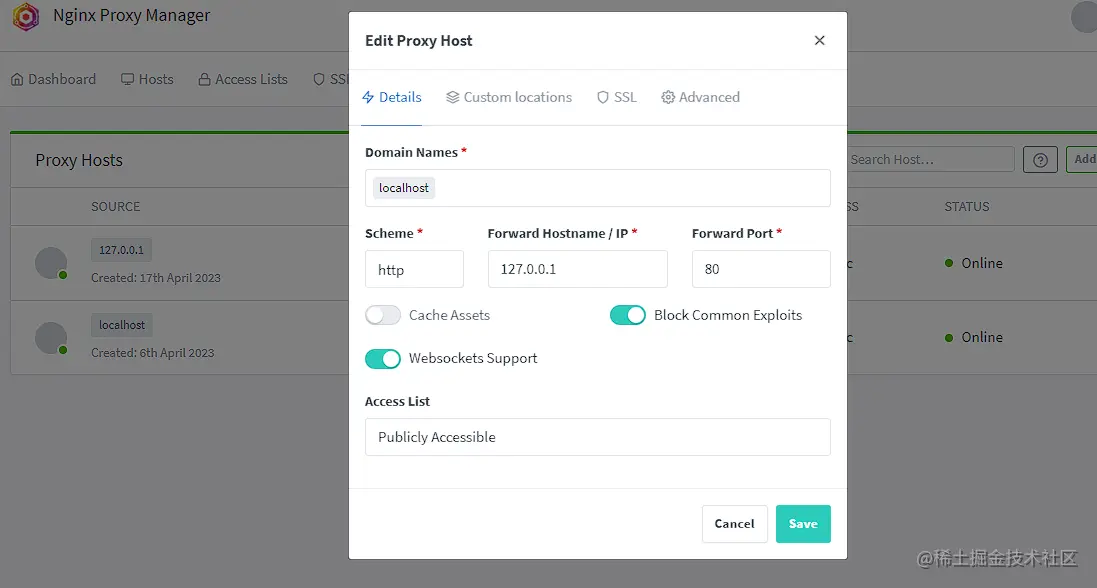
以whoami为例,配置路由规则接收来源是localhost、url是/test开头的请求
测试环境是windows wsl ubuntu环境,所以使用localhost,如果是云服务器,直接填写其公网ip即可
然后在Custom locations里面添加一个location
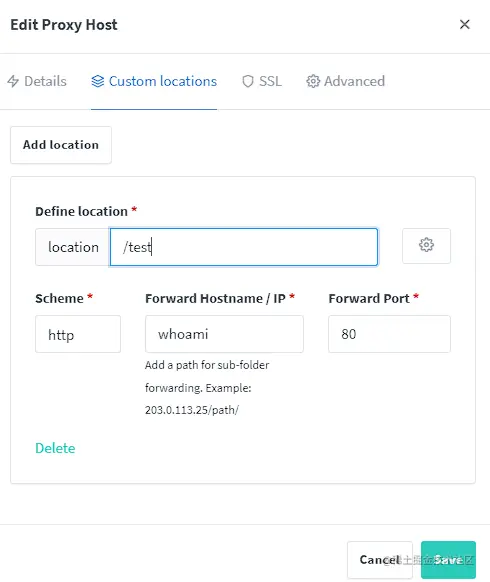
因为之前已经启动了多个whoami容器,所以此时可以直接访问http://localhost/test,多次访问也是轮询调用多个容器实例
配置静态资源
既然是基于Nginx实现,那么NPM肯定可以配置静态资源访问,这也是NPM和Traefik的一个区别,Traefik更多是做反向代理的用途。
上面已经把data目录挂载出来了,所以可以直接在data目录下新建test目录,新增123.txt、test.html文件
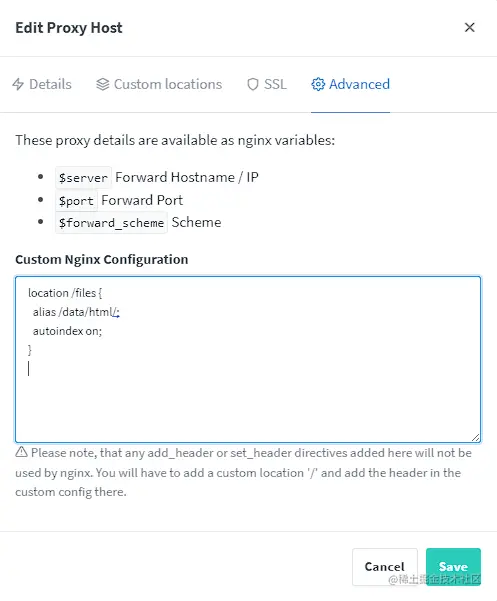
接下来在控制台配置静态资源访问,配置入口:Proxy Host -> Advanced -> Custom Nginx Configuration
location /files {
  alias /data/html/;
  autoindex on;
}
也可以直接访问 http://localhost/files/123.txt 查看文件内容
配置upstream负载均衡
upstream在Nginx中配置示例如下
upstream backend {
    server backend1.example.com:8080;
    server backend2.example.com:8080;
}
server {
    location / {
        proxy_pass http://backend;
    }
}
直接在NPM控制台的location里面配置不了upstream,我们可以找到其提供的自定义配置入口。 通过查阅NPM官方文档-高级配置,可以知道自定义配置路径是 /data/nginx/custom 其中http块配置可以用下面2个,选其一即可
/data/nginx/custom/http_top.conf #包含在主 http 块的顶部
/data/nginx/custom/http.conf #包含在主 http 块的末尾-
在挂载路径 data/nginx下新建custom目录,在下面新建http.conf文件
upstream whoami-upstream {
server 172.19.0.3:80;
server 172.19.0.4:80;
server 172.19.0.5:80;
}
这里直接配置whoami的容器ip,方便测试
-
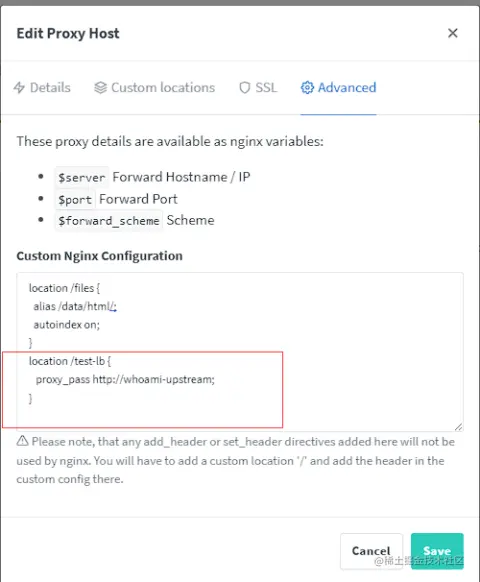
在控制台Advanced配置里自定义 location
location /test-lb {
proxy_pass http://whoami-upstream;
}
然后访问 http://localhost/test-lb 测试,请求仍然会轮询调用whoami服务。
NPM实现原理
既然NPM是基于Nginx,那么只要找到Nginx的默认配置,即可知道它的实现原理。本质上是对Nginx配置的管理。 执行docker compose logs,从NPM的启动日志可以看到默认的配置路径:
nginx-proxy-manager-nginx-proxy-manager-1  | - /etc/nginx/conf.d/production.conf
nginx-proxy-manager-nginx-proxy-manager-1  | - /etc/nginx/conf.d/include/ssl-ciphers.conf
nginx-proxy-manager-nginx-proxy-manager-1  | - /etc/nginx/conf.d/include/proxy.conf
nginx-proxy-manager-nginx-proxy-manager-1  | - /etc/nginx/conf.d/include/force-ssl.conf
nginx-proxy-manager-nginx-proxy-manager-1  | - /etc/nginx/conf.d/include/block-exploits.conf
nginx-proxy-manager-nginx-proxy-manager-1  | - /etc/nginx/conf.d/include/assets.conf
nginx-proxy-manager-nginx-proxy-manager-1  | - /etc/nginx/conf.d/include/letsencrypt-acme-challenge.conf
nginx-proxy-manager-nginx-proxy-manager-1  | - /etc/nginx/conf.d/include/ip_ranges.conf
nginx-proxy-manager-nginx-proxy-manager-1  | - /etc/nginx/conf.d/include/resolvers.conf
nginx-proxy-manager-nginx-proxy-manager-1  | - /etc/nginx/conf.d/default.conf
执行docker compose exec nginx-proxy-manager bash 进入容器,查看对应的conf文件内容
default.conf默认监听80、443端口(处理转发请求),production.conf默认监听81端口(处理控制台请求)
nginx主配置文件
路径:/etc/nginx/nginx.conf 内容如下:
# run nginx in foreground
daemon off;
pid /run/nginx/nginx.pid;
user npmuser;

# Set number of worker processes automatically based on number of CPU cores.
worker_processes auto;

# Enables the use of JIT for regular expressions to speed-up their processing.
pcre_jit on;

error_log /data/logs/fallback_error.log warn;

# Includes files with directives to load dynamic modules.
include /etc/nginx/modules/*.conf;

events {
        include /data/nginx/custom/events[.]conf;
}

http {
        include                       /etc/nginx/mime.types;
        default_type                  application/octet-stream;
        sendfile                      on;
        server_tokens                 off;
        tcp_nopush                    on;
        tcp_nodelay                   on;
        client_body_temp_path         /tmp/nginx/body 1 2;
        keepalive_timeout             90s;
        proxy_connect_timeout         90s;
        proxy_send_timeout            90s;
        proxy_read_timeout            90s;
        ssl_prefer_server_ciphers     on;
        gzip                          on;
        proxy_ignore_client_abort     off;
        client_max_body_size          2000m;
        server_names_hash_bucket_size 1024;
        proxy_http_version            1.1;
        proxy_set_header              X-Forwarded-Scheme $scheme;
        proxy_set_header              X-Forwarded-For $proxy_add_x_forwarded_for;
        proxy_set_header              Accept-Encoding "";
        proxy_cache                   off;
        proxy_cache_path              /var/lib/nginx/cache/public  levels=1:2 keys_zone=public-cache:30m max_size=192m;
        proxy_cache_path              /var/lib/nginx/cache/private levels=1:2 keys_zone=private-cache:5m max_size=1024m;

        log_format proxy '[$time_local] $upstream_cache_status $upstream_status $status - $request_method $scheme $host "$request_uri" [Client $remote_addr] [Length $body_bytes_sent] [Gzip $gzip_ratio] [Sent-to $server] "$http_user_agent" "$http_referer"';
        log_format standard '[$time_local] $status - $request_method $scheme $host "$request_uri" [Client $remote_addr] [Length $body_bytes_sent] [Gzip $gzip_ratio] "$http_user_agent" "$http_referer"';

        access_log /data/logs/fallback_access.log proxy;

        # Dynamically generated resolvers file
        include /etc/nginx/conf.d/include/resolvers.conf;

        # Default upstream scheme
        map $host $forward_scheme {
                default http;
        }

        # Real IP Determination

        # Local subnets:
        set_real_ip_from 10.0.0.0/8;
        set_real_ip_from 172.16.0.0/12; # Includes Docker subnet
        set_real_ip_from 192.168.0.0/16;
        # NPM generated CDN ip ranges:
        include conf.d/include/ip_ranges.conf;
        # always put the following 2 lines after ip subnets:
        real_ip_header X-Real-IP;
        real_ip_recursive on;

        # Custom
        include /data/nginx/custom/http_top[.]conf;

        # Files generated by NPM
        include /etc/nginx/conf.d/*.conf;
        include /data/nginx/default_host/*.conf;
        include /data/nginx/proxy_host/*.conf;
        include /data/nginx/redirection_host/*.conf;
        include /data/nginx/dead_host/*.conf;
        include /data/nginx/temp/*.conf;

        # Custom
        include /data/nginx/custom/http[.]conf;
}

stream {
        # Files generated by NPM
        include /data/nginx/stream/*.conf;

        # Custom
        include /data/nginx/custom/stream[.]conf;
}

# Custom
include /data/nginx/custom/root[.]conf;
从include顺序可以知道,它在http块中先是include /data/nginx/custom/http_top[.]conf
然后 include /data/nginx/proxy_host/*.conf,而控制台对应的配置就在这个data/nginx目录
最后include /data/nginx/custom/http[.]conf。这样也就对应了官方文档说明的:
/data/nginx/custom/http_top.conf #包含在主 http 块的顶部
/data/nginx/custom/http.conf #包含在主 http 块的末尾
自定义配置
以代理配置为例,查看data/nginx/proxy_host 目录下有一个 1.conf,其内容即对应我们的自定义配置
# ------------------------------------------------------------
# localhost
# ------------------------------------------------------------
server {
  set $forward_scheme http;
  set $server         "127.0.0.1";
  set $port           80;

  listen 80;
listen [::]:80;

  server_name localhost;


location /files {
  alias /data/html/;
  autoindex on;
}
location /test-lb {
   proxy_pass http://whoami-upstream;
}

  location /test {
    proxy_set_header Host $host;
    proxy_set_header X-Forwarded-Scheme $scheme;
    proxy_set_header X-Forwarded-Proto  $scheme;
    proxy_set_header X-Forwarded-For    $remote_addr;
    proxy_set_header X-Real-IP      $remote_addr;
    proxy_pass       http://whoami:80;

  # Block Exploits
  include conf.d/include/block-exploits.conf;
  }

  location / {
    # Proxy!
    include conf.d/include/proxy.conf;
  }
  # Custom
  include /data/nginx/custom/server_proxy[.]conf;
}
可以看到,它实际是把Proxy Host 中 Custom locations 、Advanded配置合并了。
至此,Traefik和Nginx Proxy Manager的初体验就结束了~
转载:https://juejin.cn/post/7222577873792827451
版权属于:区块链中文技术社区 / 转载原创者
本文链接:https://www.bcskill.com/index.php/archives/1925.html
相关技术文章仅限于相关区块链底层技术研究,禁止用于非法用途,后果自负!本站严格遵守一切相关法律政策!
