您正在查看: Other 分类下的文章

2059 – 身份验证插件’caching_sha2_password’-navicat连接异常

这个问题是由于我的MySQL的的的更新至8版本以上了,在安装的时候我并没有指定用户登入密码加密方式,所以默认被设置为caching_sha2_password
解决方法:

mysql> show variables like 'default_authentication_plugin';
Variable_name Value
default_authentication_plugin caching_sha2_password

查看本地mysql用户的信息

mysql> select host,user,plugin from mysql.user;
host user plugin
localhost mysql.infoschema caching_sha2_password
localhost mysql.session caching_sha2_password
localhost mysql.sys caching_sha2_password
localhost root caching_sha2_password

注意 caching_sha2_password, 只修改root的密码加密方式就可以了

mysql> ALTER USER 'root'@'localhost' IDENTIFIED WITH mysql_native_password BY '123456';
mysql> select host,user,plugin from mysql.user;
host user plugin
localhost mysql.infoschema caching_sha2_password
localhost mysql.session caching_sha2_password
localhost mysql.sys caching_sha2_password
localhost root mysql_native_password

goland: x86_64-pc-cygwin/bin/ld: cannot find -lmingwex cannot find -lmingw32

使用tdm-gcc
https://jmeubank.github.io/tdm-gcc/download/
然后再系统环境变量path里把tdragon的位置上移到cygwin上面,
让系统调用gcc时先识别tdragon的gcc,或者直接把cygwin的环境路径直接删除了,
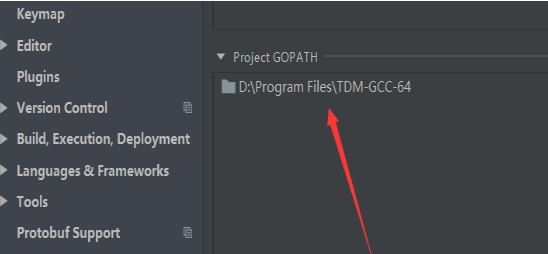
或者直接从goland里的settings->Go->GoPath里添加tdragon的路径,如下图

WSL tail -f 命令失效

tail -f命令可以查看文件更新的记录,但是在wsl中,可能无法正常工作。

经查找发现,Linux是通过inotify来获取文件变动的,但是不知道是bug还是什么原因,感知不到文件变动,造成此问题。

解决方案:

tail -f ---disable-inotify info.log

转载自:http://www.txllive.top/?p=30

Windows10 WSL 开启 ssh,CLion远程调试

由于Linux代码调试需要,如果当前开发系统是windows的话,可以选择使用CLion 远程链接 WSL。
所以需要子系统开启ssh

安装 ssh

sudo apt-get install openssh-server

Linux 开启密码登录

sudo vim /etc/ssh/sshd_config

找到passwordAuthentication项,修改成yes
重启ssh服务

sudo service sshd restart

查看服务状态

service ssh status
# * sshd is running  显示此内容则表示启动正常

如果提示 sshd error: could not load host key 则需要重新生成 key

dpkg-reconfigure openssh-server

如需密码设置

sudo passwd user-name

如果启动sshd时,报“Could not load host key”

Could not load host key: /etc/ssh/ssh_host_rsa_key
Could not load host key: /etc/ssh/ssh_host_ecdsa_key
Could not load host key: /etc/ssh/ssh_host_ed25519_key

查看下文件是否存在

ll /etc/ssh/

解决方法,重新生成密钥文件

ssh-keygen -t rsa -f /etc/ssh/ssh_host_rsa_key
ssh-keygen -t ecdsa -f /etc/ssh/ssh_host_ecdsa_key
ssh-keygen -t ed25519 -f /etc/ssh/ssh_host_ed25519_key

Clion中子系统配置请参考《Clion Windows Linux子系统

如果启动报 ssh:unrecognized service

sudo /etc/init.d/ssh restart
sudo /etc/init.d/ssh start

ubuntu 安装 gdb

sudo apt update
sudo apt install gdb

参考

https://www.jetbrains.com/help/clion/quick-tutorial-on-configuring-clion-on-windows.html#WSL
https://www.cnblogs.com/netonline/p/7410586.html
https://blog.csdn.net/zhouzme/article/details/81087837
http://www.gdbtutorial.com/tutorial/how-install-gdb

git 提示 fatal: Authentication failed for 'http://***********‘’得解决方法

首先用 git config --list 查看一下

user.name=surou
user.email=652511569@qq.com

如果不对,用命令设置一下

git config --global user.name "xxxx"
git config --global user.email  "xxxx"

如果还不行,执行一下命令,重新输入用户名密码就可以了:

git config --system --unset credential.helper

如果是Windows平台提示权限不足,就去git 安装目录右键管理员权限运行git-bash.exe,然后再切换到仓库目录再次执行。