介绍
伊斯坦布尔拜占庭容错(IBFT)共识是受Castro-Liskov 99论文启发的。
了iBFT通过使用3相一致,从原来PBFT继承PRE-PREPARE,PREPARE和COMMIT。系统最多可以容忍验证器网络中的F故障节点N,其中N = 3F + 1。
执行
术语
- Validator:阻止验证参与者。
- Proposer:区块验证参与者,被选择在共识回合中提议区块。
- Round:共识轮。一轮以提议者创建整体提议开始,以整体承诺或轮次更改结束。
- Proposal:正在进行共识处理的新区块生成提案。
- Sequence:投标的序号。序列号应大于所有先前的序列号。当前,每个建议的块高度是其关联的序列号。
- Backlog:用于保存将来的共识消息的存储。
- Round state:特定顺序和回合的共识消息,包括预准备消息,准备消息和提交消息。
- Consensus proof:可以证明该区块已通过共识过程的区块的承诺签名。
- Snapshot:验证者从上一个时期开始的投票状态。
共识
《伊斯坦布尔BFT共识协议》从回合开始,0验证者以循环方式从他们自己选择提议者。然后,提议者将提出一个新的整体提议,并将其与PRE-PREPARE消息一起广播。在收到PRE-PREPARE来自提议者的消息后,其他验证者将验证传入的提议并输入消息的状态PRE-PREPARED并广播PREPARE消息。此步骤是确保所有验证程序都在相同的序列和同一轮上工作。当验证器从其他验证器接收到ceil(2N/3)ofPREPARE消息时,验证器将切换到的状态PREPARED并进行广播COMMIT信息。此步骤是要通知其他验证者它接受建议的块,并将该块插入到链中。最后,验证等待ceil(2N/3)的COMMIT消息进入COMMITTED状态,再追加块链。
Istanbul BFT协议中的块是最终的,这意味着没有分叉,并且任何有效块都必须位于主链中的某个位置。为了防止故障节点生成与主链完全不同的链,每个验证器都会在将ceil(2N/3)接收到的COMMIT签名extraData插入到链中之前,将接收到的签名附加到标头中的字段。因此,所有块都是可自我验证的。但是,动态extraData会导致块哈希计算出现问题。由于来自不同验证器的同一块可以具有不同的COMMIT签名集,因此同一块也可以具有不同的块哈希。为了解决这个问题,我们通过排除COMMIT签名部分来计算块哈希。因此,我们仍然可以保持块/块哈希的一致性,并在块头中放入共识证明。
共识国家
Istanbul BFT是一种状态机复制算法。每个验证器维护一个状态机副本,以便达成块共识。IBFT共识中的各个州是,
- NEW ROUND:提案人发送新的整体提案。验证程序等待PRE-PREPARE消息。
- PRE-PREPARED:验证者已收到PRE-PREPARE消息并广播PREPARE消息。然后,它等待ceil(2N/3)的PREPARE或COMMIT消息。
- PREPARED:验证器接收到ceil(2N/3)的PREPARE消息和广播COMMIT消息。然后,它等待ceil(2N/3)的COMMIT消息。
- COMMITTED:验证器接收到ceil(2N/3)的COMMIT消息,并且能够将提出块插入blockchain。
- FINAL COMMITTED:将一个新块成功插入到区块链中,并且验证器已准备好进行下一轮。
- ROUND CHANGE:一个验证正在等待ceil(2N/3)的ROUND CHANGE同一提出全面数量的消息。
状态转换
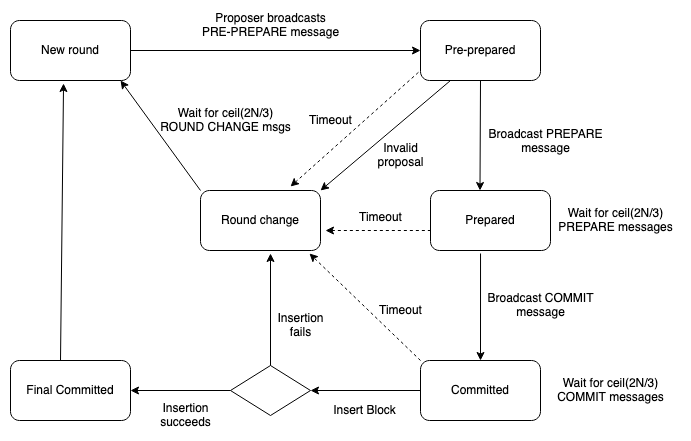
- NEW ROUND-> PRE-PREPARED:
- 投标人从收集交易txpool。
- 提议者生成一个整体提议并将其广播给验证者。然后进入PRE-PREPARED状态。
- 每个验证器PRE-PREPARED在收到PRE-PREPARE具有以下条件的消息时都会进入:
- 整体提案来自有效的提案者。
- 块头有效。
- 阻止提议的顺序和回合匹配验证者的状态。
- 验证者将PREPARE消息广播到其他验证者。
- PRE-PREPARED-> PREPARED:
- 验证器接收ceil(2N/3)到有效PREPARE消息以进入PREPARED状态。有效消息符合以下条件:
- 匹配顺序和舍入。
- 匹配的块哈希。
- 消息来自已知的验证器。
- 验证器COMMIT在进入PREPARED状态时广播消息。
- PREPARED-> COMMITTED:
- 验证器接收ceil(2N/3)到有效COMMIT消息以进入COMMITTED状态。有效消息符合以下条件:
- 匹配顺序和舍入。
- 匹配的块哈希。
- 消息来自已知的验证器。
- COMMITTED-> FINAL COMMITTED:
- 验证程序将ceil(2N/3)承诺签名附加到extraData并尝试将块插入到区块链中。
- FINAL COMMITTED插入成功后,验证器进入状态。
- FINAL COMMITTED-> NEW ROUND:
- 验证者选择一个新的提议者,并开始一个新的回合计时器。
回合变更流程
- 可以触发ROUND CHANGE以下三个条件:
- 轮换计时器到期。
- 无效的PREPREPARE讯息。
- 块插入失败。
- 当验证者注意到上述条件之一适用时,它将广播ROUND CHANGE消息以及建议的轮回编号,并等待ROUND CHANGE来自其他验证者的消息。根据以下条件选择建议的轮数:
- 如果验证已收到ROUND CHANGE来自同行的消息,它选择具有最大回合数F + 1的ROUND CHANGE消息。
- 否则,它将选择1 + current round number为建议的轮数。
- 验证器每当收到相同提议轮数上的消息时,就会将接收F + 1到的ROUND CHANGE消息与自己的消息进行比较。如果接收到的ROUND CHANGE消息更大,则验证器将使用接收到的号码再次广播消息。
- 当接收ceil(2N/3)的ROUND CHANGE在同提出的圆数量的消息,所述验证器退出轮变化循环,计算出新的提议,然后进入NEW ROUND状态。
- 验证器跳出舍入循环的另一个条件是它通过对等同步接收到已验证的块。
提案人选择
目前,我们支持两种政策:轮循和粘性提议者。
- 轮询:轮询是默认的提议者选择策略。在此设置中,提议者将在每个区块和每个回合中更改。
- 粘性提议者:在粘性提议者设置中,仅在发生回合更改时提议者才会更改。
验证人名单投票
Istanbul BFT使用与Clique类似的验证者投票机制,并从Clique EIP复制大部分内容。每个时代的交易都会重置验证者投票,这意味着将添加或删除验证者的所有待处理投票都将重置。
对于所有交易块:
- 提议者可以投一票以提议更改验证者列表。
- 每个目标受益人的最新提议仅由单个验证者保存。
- 随着链条的进行,将实时计票(允许并发提案)。
- 达成多数共识的提案VALIDATOR_LIMIT立即生效。
- 无效的建议书不会因为客户实施的简化而受到惩罚。
- 提案生效后,必须放弃该提案的所有未决票(赞成和反对)。
未来的消息和积压
在异步网络环境中,可能会收到将来无法在当前状态下处理的消息。例如,验证程序可以COMMIT在上接收消息NEW ROUND。我们称这种消息为“未来消息”。当验证器收到将来的消息时,它将把消息放入待办事项中,并尝试在以后尽可能的处理。
常数
Istanbul BFT定义以下常量
- EPOCH_LENGTH:默认:30000个块。检查点并重置未决投票的块数。
- REQUEST_TIMEOUT:在以毫秒为单位触发一轮变更之前,每个共识轮都超时。
- BLOCK_PERIOD:两个连续块之间的最小时间戳差异(以秒为单位)。
- PROPOSER_POLICY:投标者选择策略,默认为轮询。
- ISTANBUL_DIGEST:固定幻数0x63746963616c2062797a616e74696e65206661756c7420746f6c6572616e6365的mixDigest在伊斯坦布尔块识别块标题。
- DEFAULT_DIFFICULTY:默认阻止难度,设置为0x0000000000000001。
- EXTRA_VANITY:为提议者虚荣保留的固定数量的额外数据前缀字节。
- NONCE_AUTH:不可思议的随机数0xffffffffffffffff,可在添加验证器时进行投票。
- NONCE_DROP:不可思议的随机数,0x0000000000000000用于对删除验证程序进行投票。
- UNCLE_HASH:总是Keccak256(RLP([]))像叔叔在PoW之外毫无意义。
- PREPREPARE_MSG_CODE:固定号码0。消息的消息代码PREPREPARE。
- PREPARE_MSG_CODE:固定号码1。消息的消息代码PREPARE。
- COMMIT_MSG_CODE:固定号码2。消息的消息代码COMMIT。
- ROUND_CHANGE_MSG_CODE:固定号码3。用于消息的代码ROUND CHANGE的消息
- VALIDATOR_LIMIT:通过授权或取消授权提议的验证者数量。
- 必须floor(N / 2) + 1在链上执行多数共识。
块头
Istanbul BFT不会添加新的块标题字段。相反,它遵循Clique重新使用ethash标头字段的方式,如下所示:
-
nonce:有关受益人字段定义的帐户的提案人提案。
- 应NONCE_DROP提议取消授权受益人为现有验证人。
- 应该是NONCE_AUTH提议授权受益人为新的验证人。
- 必须用零填充,NONCE_DROP或NONCE_AUTH
-
mixHash:固定0x63746963616c2062797a616e74696e65206661756c7420746f6c6572616e6365用于识别伊斯坦布尔街区的魔幻数字。
-
ommersHash:必须如此,UNCLE_HASH因为叔叔在PoW之外毫无意义。
-
timestamp:必须至少是父时间戳+ BLOCK_PERIOD
-
difficulty:必须填充0x0000000000000001。
-
extraData:签名人虚荣和RLP编码的Istanbul额外数据的组合字段,其中Istanbul额外数据包含验证者列表,提议者印章和提交印章。伊斯坦布尔的额外数据定义如下:
type IstanbulExtra struct {
      Validators    []common.Address  //Validator addresses
      Seal          []byte            //Proposer seal 65 bytes
      CommittedSeal [][]byte          //Committed seal, 65 * len(Validators) bytes
}
因此,extraData形式为EXTRA_VANITY | ISTANBUL_EXTRAwhere|代表固定索引,以分隔虚荣和伊斯坦布尔额外数据(不是分隔符的实际字符)。
-
前EXTRA_VANITY字节(固定)可以包含任意提议者虚荣数据。
-
ISTANBUL_EXTRA字节是根据所计算的RLP编码的Istanbul额外数据RLP(IstanbulExtra),其中RLP()RLP编码函数IstanbulExtra是Istanbul的额外数据。
- Validators:验证者列表,必须按升序排列。
- Seal:标头的提议者签名盖章。
- CommittedSeal:承诺签名盖章清单作为共识证明。
散列哈希,提议者印章和承诺印章
ethash由于以下原因,Istanbul区块哈希计算与区块哈希计算有所不同:
- 提议者需要盖上提议者的印章,extraData以证明该区块已被选定的提议者签名。
- 验证者需要放入ceil(2N/3)已提交的印章作为共识证明,extraData以证明该区块已通过共识。
ethash除了需要处理之外,该计算仍然类似于块哈希计算extraData。我们计算字段如下:
投标人印章计算
到提议者印章计算时,提交的印章仍然是未知的,因此我们计算出那些未知数为空的印章。计算如下:
- Proposer seal: SignECDSA(Keccak256(RLP(Header)), PrivateKey)
- PrivateKey:提议者的私钥。
- Header:与ethash标头相同,只是不同而已extraData。
- extraData:vanity | RLP(IstanbulExtra),其中在IstanbulExtra,CommittedSeal并且Seal是空的阵列。
区块哈希计算
在计算块哈希时,我们需要排除提交的密封,因为该数据在不同的验证器之间是动态的。因此,我们CommittedSeal在计算哈希值时会创建一个空数组。计算公式为:
- Header:与ethash标头相同,只是不同而已extraData。
- extraData:vanity | RLP(IstanbulExtra),其中在IstanbulExtra,CommittedSeal是一个空数组。
共识证明
在将区块插入区块链之前,每个验证者都需要ceil(2N/3)从其他验证者那里收集已提交的印章,以构成共识证明。一旦接收到足够的承诺密封,这将填补CommittedSeal中IstanbulExtra,重新计算extraData,然后再插入块成blockchain。请注意,由于提交的密封可能因不同的来源而有所不同,因此如上一节所述,我们在计算块哈希值时会排除该部分。
承诺印章计算:
提交的印章是由每个验证者对哈希值COMMIT_MSG_CODE及其私钥的消息代码签名而计算的。计算如下:
- Committed seal:SignECDSA(Keccak256(CONCAT(Hash, COMMIT_MSG_CODE)), PrivateKey)。
- CONCAT(Hash, COMMIT_MSG_CODE):连接块哈希和COMMIT_MSG_CODE字节。
- PrivateKey:签署验证者的私钥。
出处
GoQuorum中的Istanbul BFT实施基于EIP 650。自从打开EIP以来,它已进行了更新,以通过引入锁定来解决安全问题。
原文:https://docs.goquorum.consensys.net/en/stable/Concepts/Consensus/IBFT/