您正在查看: EOS 分类下的文章

EOS开发库收集(持续更新)

开发语言

C Sharp

  • https://github.com/GetScatter/eos-sharp

    Eos eos = new Eos(new EosConfigurator()
    {    
      HttpEndpoint = "https://nodes.eos42.io", //Mainnet
      ChainId = "aca376f206b8fc25a6ed44dbdc66547c36c6c33e3a119ffbeaef943642f0e906",
      ExpireSeconds = 60,
      SignProvider = new DefaultSignProvider("myprivatekey")
    });
  • https://github.com/eosnewyork/EOSDotNet

      var chainAPI = new ChainAPI("https://api.eosnewyork.io");
    
      string  _code  =  "eosio.token", _action  =  "transfer", _memo  =  "";
      TransferArgs  _args  =  new  TransferArgs(){ from  =  "account1", to  =  "account2", quantity  =  "1.0000 EOS", memo  =  _memo };
    
      //called asynchronously
      var abiJsonToBinAsync = await chainAPI.GetAbiJsonToBinAsync(_code, _action, _args);
      //called synchronously
      var abiJsonToBinSync = chainAPI.GetAbiJsonToBin(_code, _action, _args);

    Go

  • https://github.com/eoscanada/eos-go

      api := eos.New("http://testnet1.eos.io")
    
      infoResp, _ := api.GetInfo()
      accountResp, _ := api.GetAccount("initn")
      fmt.Println("Permission for initn:", accountResp.Permissions[0].RequiredAuth.Keys)

Python

  • https://github.com/EvaCoop/eosjs_python

      from eosjs_python import Eos
    
      eos = Eos({
          'http_address': 'http://172.18.0.1:8888',
          'key_provider': '5KQwrPbwdL6PhXujxW37FSSQZ1JiwsST4cqQzDeyXtP79zkvFD3'
      })
    
      eos.newaccount({
          'creator': 'eosio',
          'name': 'mytestacc13',
          'owner_public_key': 'EOS7vTHtMbZ1g9P8BiyAGD7Ni7H6UALVLVCW13xZrXT4heCBke3it',
          'active_public_key': 'EOS8KKKYBBdwrmXRRynDXSxTX2qoT9TA4agahXXF4ccUgRCy81RNc',
          'buyrambytes_bytes': 8192,
          'delegatebw_stake_net_quantity': '100.0000 SYS',
          'delegatebw_stake_cpu_quantity': '100.0000 SYS',
          'delegatebw_transfer': 0
      })
  • https://github.com/eosnewyork/eospy

      # Get chain information
      pycleos --url https://api.eosnewyork.io get info
    
      # get information about a block
      pycleos --url https://api.eosnewyork.io get block 447
    
      # Retrieve an account from the blockchain
      pycleos --url https://api.eosnewyork.io get account --account eosio
    
      # Retrieve the code and ABI for an account
      pycleos --url https://api.eosnewyork.io get code --account eosio

PHP

  • https://github.com/zyq20130111/eos_php

      /* Create the rest client */
      EosApiRestClient eosApiRestClient = EosApiClientFactory.newInstance("http://127.0.0.1:8888").newRestClient();
    
      /* Create the json array of arguments */
      Map<String, String> args = new HashMap<>(4);
      args.put("from", "currency");
      args.put("to", "eosio");
      args.put("quantity", "44.0000 CUR");
      args.put("memo", "My First Transaction");
      AbiJsonToBin data = eosApiRestClient.abiJsonToBin("currency", "transfer", args);```
    
      /* Get the head block */
      Block block = eosApiRestClient.getBlock(eosApiRestClient.getChainInfo().getHeadBlockId());

Java

Dapp js 相关

ubuntu 安装最新版本 yarn

curl -sS https://dl.yarnpkg.com/debian/pubkey.gpg | sudo apt-key add -
echo "deb https://dl.yarnpkg.com/debian/ stable main" | sudo tee /etc/apt/sources.list.d/yarn.list
sudo apt-get update && sudo apt-get install yarn

NPM发布和更新包

注册登录账号

  • 网站创建账号 https://www.npmjs.com/signup
  • 或者在终端命令创建,终端内输入npm adduser输入新注册的账号和密码以及邮箱

已经创建账号后npm login登录账号
输入npm whoami可以查看已登录的账号

本篇文章只演示提交过程,假设npm包文件已准备好。
package.json内name必须唯一,version要比已上传的新

发布

执行npm publish提交文件
提交成功后会收到邮件

测试

https://npmjs.com/package/<package>即可看到新提交的npm包
e.g.e.g.https://www.npmjs.com/package/bcskill-eosio-mongodb-queries

参考:docs.npmjs.com

EOS mongodb + GraphQL 查询

为了更灵活的查询EOS blocks入库到MongoDB的数据,我们将支持 GraphQL

GraphQL

GraphQL 既是一种用于 API 的查询语言也是一个满足你数据查询的运行时。 GraphQL 对你的 API 中的数据提供了一套易于理解的完整描述,使得客户端能够准确地获得它需要的数据,而且没有任何冗余,也让 API 更容易地随着时间推移而演进,还能用于构建强大的开发者工具。

项目支持

基于开源项目 eosio-graphql 提供GraphQL支持
此项目内部依赖 eosio-mongodb-queries提供MongoDB查询支持

开始部署

clone代码

git clone https://github.com/EOS-BP-Developers/eosio-graphql.git

进入源码目录,安装依赖

cd eosio-graphql
npm i
npm 安装参考 ubuntu npm 升级到新版

修改项目配置

修改 config.ts文件中的 MongoDB uri为本地配置的MongoDB配置

export const MONGODB_URI = process.env.MONGODB_URI || "mongodb://localhost:20000";

编辑index.ts 修改远程访问地址和端口

export function eosGraphQLGateway(config: any = {}) {
  const {
    host = "0.0.0.0",
    port = 443,
    mongoClient,
    buildSchema = defaultBuildSchema,
    buildResolvers = defaultBuildResolvers,
    abiDir = "",
  } = config;

运行项目

npm start
  • 如果出现Error: Cannot find module 'typescript/tsc.js'
    sudo npm install -g typescript

此时程序已经运行

> eosio-graphql@0.2.0 start /mnt/data/eosio-graphql
> tsc && node service.js

?. Server ready at http://0.0.0.0:443/graphql

访问服务器

访问服务器ip:端口/graphql
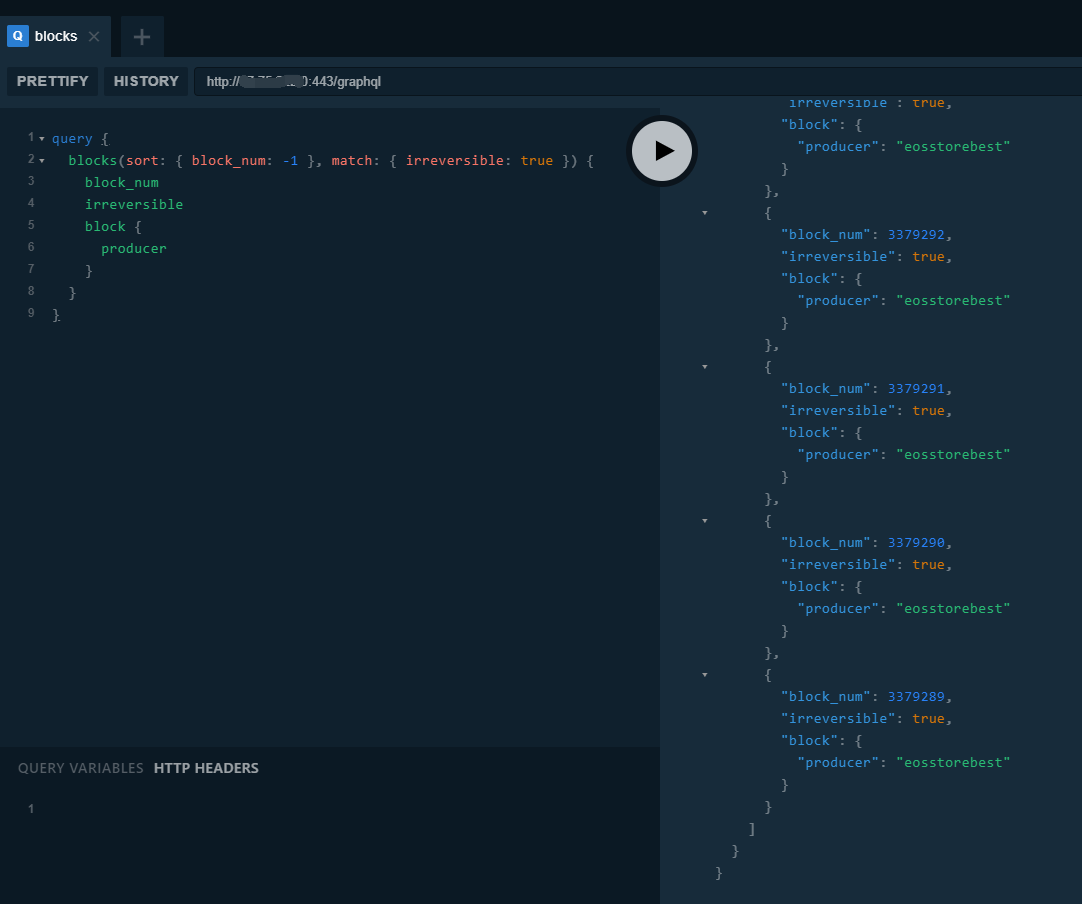
测试查询

query {
  blocks(sort: { block_num: -1 }, match: { irreversible: true }) {
    block_num
    irreversible
    block {
      producer
    }
  }
}

注意

由于eosio-mongodb-queries项目中写死了查询的EOS在MongoDB数据库名称为EOS(区分大小写),所以要将nodeos同步到MongoDB数据库时,确认数据库名字为EOS

plugin = eosio::mongo_db_plugin
mongodb-uri = mongodb://localhost:20000/EOS
mongodb-filter-on = *

常规保证EOS智能合约资金安全

方法一:多重签名智能合约

EOS权限体系通过权重(Weight)和阈值(Threshold)来限制合约账户,可以实现多个人共同管理一个账户资金,假设智能合约账户有5个人的公钥,每个公钥的权重为1,权限的总阈值为3,这就表示必须要这5个人中至少3个人签名,才可以转移资金和修改合约代码。

方法二:移交智能合约权限

这种方式也比较安全,我们可以修改合约权限为eosio.prods账户,直接将智能合约权限移交给官方21个节点来控制,未来如果需要转移资金或修改合约,则需要申请节点仲裁。

方法三:设置合约黑洞公钥

这种方式是最接近区块链定义的,我们可以将智能合约权限修改为黑洞公钥,官方在超级节点竞选时临时用过的这个公钥:EOS1111111111111111111111111111111114T1Anm,它的公钥是0值加检验数据生成的,任何人都不知道它的私钥,未来合约也不可能再被转移资金或修改。